Difference between revisions of "Arich's Ambush"
| Line 43: | Line 43: | ||
*Buffer B + Y when landing on the branch, hold left to jump onto Arich's leg | *Buffer B + Y when landing on the branch, hold left to jump onto Arich's leg | ||
*It can help to slide backwards as Kiddy is picking up the barrel | *It can help to slide backwards as Kiddy is picking up the barrel | ||
| − | *Position Kiddy on the middle of the branch, quickly turn and throw upwards (see cue video) | + | *Position Kiddy on the middle of the branch, quickly turn and throw upwards (see cue video below) |
3rd Hit | 3rd Hit | ||
Revision as of 00:16, 4 June 2022
 | |
| Game | Donkey Kong Country 3 |
|---|---|
| World name | Kremwood Forest |
| Level name | Bobbing Barrel Brawl |
| Previous level |
Bobbing Barrel Brawl Bobbing Barrel Brawl 103 Bobbing Barrel Brawl Warpless |
| Next level |
Fire-Ball Frenzy Fire-Ball Frenzy 103 Kremwood Forest to Krematoa |
Difficulty:
- Safe: 2/10
- Optimal: 9/10
- Optimal alternative: 10/10
Any%
Safe
Notes:
- Don't forget to drop the barrel on the ground for Arich's last pattern (holding B -> Hold Down -> Release B)
Optimal
Notes:
- To properly achieve hits on Arich you'll want to fall straight down off the platform above so you won't clash your barrel with legs.
- For the second hit you'll need to jump after falling to land the hit properly on Arich.
- For the third and fourth hits you won't need to jump out of your fall but just fall and throw before landing.
- Grabbing the patch from underneath is the most optimal, to achieve this it's best to try and jump during the sound of him falling.
- Arich tends to have irregular patterns at times even with similar or same movement, so you'll have to adjust how you throw but sometimes you can't help the inevitable World 2 reset with this boss.
- to land hits 3 and 4 consistently drop straight down as normal. Start barrel throw as soon as Kiddies bottom hand crosses the boundary of the tree branch indicated
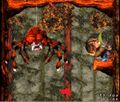
Tree branch highlighted
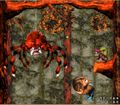
Almost to release point


Optimal alternative
Notes:
Saves about 2 seconds over optimal Arich, but very risky
1st Hit
- Hold B while entering the level to buffer a jump
- Buffer B + Y when landing on the branch, hold left to jump onto Arich's leg
- It can help to slide backwards as Kiddy is picking up the barrel
- Position Kiddy on the middle of the branch, quickly turn and throw upwards (see cue video below)
3rd Hit
- Arich's position will vary slightly depending on the 2nd hit and team throw
- If the 3rd hit is missed, adjust accordingly for the 2nd chance
Dixie backup
Notes:
- By doing that little hover at the top Arich will be baited into dropping down and instantly coming back up ending his spit ball phase.
- This is meant as a backup for when you lose kiddie but don't want to reset.