Criss Kross Cliffs 103
 | |
| Game | Donkey Kong Country 3 |
|---|---|
| World name | Krematoa |
| Level name | Criss Kross Cliffs |
| Previous level | Stampede Sprint 103 |
| Next level | Tyrant Twin Tussle 103 |
Safe (no zips, no bee skips)
Notes
- The safe route does not make use of any zips or bee skips. You can still skip killing most of the bees by scrolling them off screen. This is only possible on the U version, as the J and PAL versions have added extra bees that block your path.
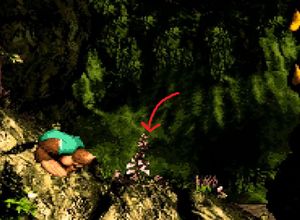
- Getting into the first bonus is rather tricky without taking damage. At the start, do two rolls and then do a big jump once Kiddy reaches the flower in the background as seen in the image below. Count 11 bounces on the kegs, then bounce to the right into the bonus.
- In the first bonus, by teamthrowing Dixie to the left side, you can cover both banana spawning points. You can use the shadow on the right side as a cue for where to throw Dixie from.
- If you got the consistent banana bonus patterns in Stampede Sprint, the first banana should spawn on the left and the second banana on the right in this bonus.
- After the second bonus, go far enough right to reactive the kegs, otherwise you cannot progress.
- 2:01 is rather tricky to do without taking damage or dropping to the lower rope before turning the TNT barrels back into kegs. Taking damage here is not a big deal, you can swap back in the next stage.
Intermediate (some zips and bee skips)
Notes
- The intermediate route makes use of bee skips and the zips that save the most time.
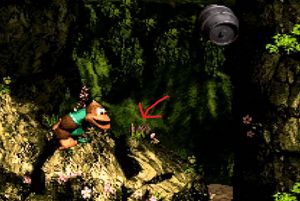
- To do the first zip, run until the flower in the background as seen in the image below. Then team up, do a full jump and team throw up. Once the teamthrow gets interrupted hold left to zip.
- Entering the first bonus can be tricky. Wait until the screen scrolls up until the Kongs are visible, then jump to the right and the keg should line up.
- By teaming up and standing far enough left on a keg, Kiddy can bypass some Buzzers. A good cue to know if Kiddy stands far enough left is if the cliff in the background is visible to the right of the Kongs.
- At 0:46 the team throw may not reach the next platform if Kiddy jumped on the keg when it was not at the correct height. Try to follow the video as closely as possible to avoid this happening. If this happens, you can stay on the kegs and try again.
- At 0:57, if you don't go far enough right instead of having the team throw interrupted, the Kongs will be bounced up. Try to go to the right of where the bananas where.
- For the zip at 1:45 try to find a way to time the teamthrow to line up with a steel keg.
Optimal (all zips)
Notes
- The optimal route makes use of all zips. Saves just under 7 seconds if everything goes well.
- Getting all the zips is tough. Try to find cues or setups that work well for you. Cues/setups that are used in the video are for example to team throw past the peak of the jump (0:39), team throw once the jump reaches the bananas (0:47) or starting a jump when the previous keg is in front of Kiddy's face (0:57).
- At 0:41 go left a bit to make the kegs spawn sooner.
- At 1:01 sometimes the first keg can be shot up a earlier and you'll have to zip off the second keg, try to find a setup that is able to react to both scenarios. You can see an example of this in more strats (0:17).
MORE STRATS
Notes
- To do the alternative start, roll twice until the flower in the image below. Then jump on the kegs and hold right (no Y) on the 8th bounce. Start a roll as soon as Kiddy touches the floor to get past the bee. Is approximately 0.2 seconds slower than the zip, but entering the bonus may be easier.
- You can do a 2-1 jump to instead of one of the zips. Saves approximately 0.4 seconds.
- For one of the zips sometimes the first keg spawns too early to be able to zip off of it and you'll have to zip off the second keg instead.
- The keg bounce, which happens whenever you team throw too close to a keg, can allow you to get to the DK coin faster. Make sure you are far enough right to get the bounce instead of the zip, and move left a bit to avoid getting hit by the bee on the team throw.
- Instead of the keg bounce, you can also zip off the lower of the two barrels and this will sometimes allow you to skip the bounce off the keg on the way down to the Koin.
- The ending at 0:28 is similar to the ending of Beat Krematoa and can save approximately 0.8 seconds, but is harder.
- The original optimal strategy to get to the goalpost was a final Buzzer skip, but this strategy is slower and arguably more difficult. This bee is further left which requires you to move to the left after bouncing off the keg to get past the Buzzer.


