Creepy Caverns GBA
| Game | Donkey Kong Country 3 (GBA) |
|---|---|
| World name | KAOS Kore |
| Level name | Creepy Caverns |
| Previous level | Konveyor Rope Klash |
| Next level | Lightning Lookout |
Any%
Optimal
Notes
- The ghost barrels are random, and do not follow a pattern. This means it can in theory keep pointing in the wrong direction indefinitely.
- The first ghost barrel can be skipped. As soon as the ghost barrel spawns for the second time, jump and start team throwing just below the ghost barrel. This allows you to climb the wall and get past the ghost barrel.
- If the ghost barrel points up the second or third time it spawns, you can bail out of the setup and enter the ghost barrel normally.
- Release the d-pad when being fired out of the autofire barrel to get shot further.
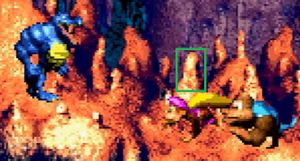
- The jump over the Krumple at 0:25 is pretty precise. You can use the stalagmite indicated below as a visual cue.
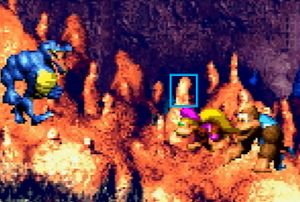
- Similarly, the jump over the two Krumples at 0:30 is precise. The stalagmite indicated below can be used as a visual cue here.
- Killing the Buzzer with the DK barrel at 0:51 is almost half a second faster than waiting for the ghost barrel.
- If the ghost barrel at 0:53 points up the first time, it is difficult to react in time to make it. A short pause is used in the video to make it easier.
- If you release the d-pad upon being shot out of the ghost barrel at 1:16, the Kongs will be shot into the Koin and bounced back. In this case, it is faster to hold right to be shot less far.
- If the ghost barrel points up/right the first time at 1:19, it is faster to drop into it. An example of the movement afterwards is shown in 'more strats'. Furthermore, the damage on the Buzzer can be avoided with precise movement, also shown in 'more strats'.
MORE STRATS
Notes
- Team throwing up into the autofire barrel is precise, as you need to have enough height after the jump off Kiddy, but you don't have to do another team throw.
- To perform the second ghost barrel skip, position yourself on the right side of the left Buzzer. As soon as the ghost barrel spawns for the second time, jump until you're right underneath it and team throw. The most difficult part is avoiding the Buzzers with Kiddy when he bounces back after the second team throw into the wall at 0:14.
- To perform the third ghost barrel skip, the positioning is quite precise. You want to be completely to the right of the ghost barrel, but still far enough from the wall to be able to jump off Kiddy after he bounces off the wall. As soon as the ghost barrel spawns for the second time, do a full jump and team throw at the peak of the jump. Make sure you have enough height to be above the Buzzers for the second team throw, and jump into the autofire barrel as soon as possible to prevent Kiddy from getting hit after bouncing back.
- Similarly to the first ghost barrel skip, you can perform an up throw into the autofire barrel instead. This only works if you have enough height and is quite precise.
- Two alternative endings are shown.
- By landing right in front of the Buzzer and jumping over it, you can damage boost later for an arguably easier ending.
- If the ghost barrel points up/right the first time, you can perform the same damage boost.

