Gusty Glade
 | |
| Game | Donkey Kong Country 2 |
|---|---|
| World name | Gloomy Gulch |
| Level name | Gusty Glade |
| Previous level | Haunted Hall |
| Next level | Parrot Chute Panic |
Difficulty:
- Safe: 4/10
- Optimal: 7/10
- Optimal Wrong Warp: 13/10
Contents
Any%
Safe
Notes
- The wind can be used to your advantage in this level. An example being the 3 first pits of the level; by letting yourself fall a little longer, you can get a bigger wind push onto the platform.
Optimal
Additions
- At 0:10, do not grab the chest before starting your roll (Saves ~.25s).
- At 0:16, roll over the pillars, instead of jumping on all of them. This is deceptively hard since the edges of the pillars can eat your rolls.
- At 0:31 is the Rolly Roll. After jumping to the ledge with the DK barrel, momentarily let go of Y and then press it again when you're close to the ledge (Saves ~.4s).
- On failure, use either the DK barrel (if you rolled too early) or the chest (too late) to quickly dispatch a Kutlass and keep moving.
- At 0:43, do not switch to Dixie for the final glide. Instead, team throw her into the barrel, allowing you to finish the stage with Diddy and to perform a Goal Swap (Saves over 1s).
MORE STRATS
- Kipples Chestless can save minimal time if you pull it off optimally.
- With good jumps and wind usage, you can skip the 3rd rat entering the pillars section. It is pretty precise and not recommended (Saves ~.25s).
- Rat Roll saves the same amount of time as Fat Roll.
- The pillars can be done in various ways, all being the same speed.
- Alternate way to take the rat pillars. saves -0.1s over jumping on rat 2,3 and 4.
Optimal Wrong Warp
Notes
- This Wrong Warp saves around 5 seconds and is the most difficult out of all the RTA viable WWs. It's not recommended to anyone just starting off; only go for this if you're extremely confident in your abilities with it.
- At 0:03, kill both Klampons at the start: this sets up the correct ID for the beetle.
- Do not load in the beetle immediately after killing the second Klampon, wait a split second after bouncing on it before scrolling the camera to the right.
- You should also hit the Klampons on the head part rather than the tail to ensure the camera doesn't scroll to the right early.
- Do not load in the beetle immediately after killing the second Klampon, wait a split second after bouncing on it before scrolling the camera to the right.
- At 0:06, jump when Diddy's front foot is overlapping with the purple mushroom in the background to more consistently make it over the cliff. If he bonks and falls off, just try to jump again from the very base of the cliff.
- At 0:08, jump on the very back of the first Klampon to make sure you drop the beetle instead of killing it. If you miss the Klampon completely, just make it past the second one, then place the beetle down, jump on it again when it wakes up to stun it, and regrab it.
- This is done because it resets the timer that determines when the beetle wakes up in your hands.
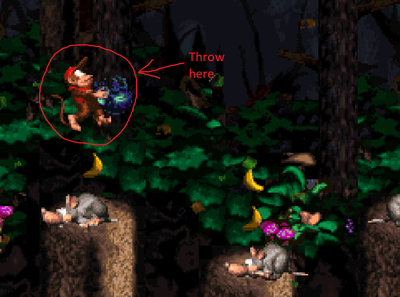
- At 0:17, throw the beetle up-right, then hold B while bouncing on the two Neeks, and land on the beetle again to stun it. You should land on it from straight above and you shouldn't have any horizontal momentum or it'll guarantee that the knockback from the beetle will push you into the pit.
- Here's the visual cue for the throw:
- At 0:21, the jump behind the Neek is pretty precise. Aim to position yourself as far right as possible on the previous pillar, then tab B at the right time (suggested visual cue: a few frames after the Neek turns around) to try to land behind the Neek, then jump again immediately on landing (this jump is bufferable).
- At 0:23, the jump onto the tall pillar can sometimes result in failure depending on your exact pixel value: the pillar you're jumping from can eat some of your speed, resulting in you not making it onto the tall pillar, or the tall pillar itself can more rarely eat your jump as you land. The best way to go about it is to develop a set of muscle memory that reduces the chances of failure as much as possible. One possibility is to land pretty far left on the pillar after the Neek jump, slow down a bit, then hold right and go for it.
- Buffer a jump as you land on the corner of said tall pillar.
- At 0:25, throw the beetle as far right as possible, then bounce on the Neek, the Klampon, and hit the beetle again.
- Don't hold B while bouncing on the Neek, but do a small B tap while landing on the Klampon. It's also recommended to land towards the back of the Klampon as opposed to its head.
- At 0:30, if the pillar before the one with the 'O' letter eats some of your speed, you can still make it, just remember to buffer a jump as you land on the corner of the pillar.
- At 0:32, do a small wiggle to make the jump over the pit easier.
- At 0:38, touch the small cliff to the left and make sure Diddy's walking animation comes to a full stop to make the cliff throw coming up more consistent.
- At 0:41, jump as close to the edge as possible, then throw the beetle up-right to bring both yourself and the beetle up there.
- If you jump on the last possible frame from the bottom ledge, the throw is a 3 frame window. If you jump on the second-to-last possible frame from the bottom ledge, the throw is a 2 frame window. Finally, if you jump from the third-to-last possible frame from the bottom ledge, the throw is a 1 frame window.
- If you threw the beetle but didn't bounce on it, it means that you were early on the throw. If you threw the beetle, bounced on it, but didn't make it onto the cliff, it means that you were late, or that you jumped too early from the bottom ledge.
- At 0:42, make sure you kill the Klampon to help set up the ID of the Bonus Barrel, then jump on the beetle, and swap to Dixie.
- At 0:46, holding left while sliding down the cliff makes getting the invisible object easier.
- After reloading the Bonus Barrel, throw the invisible object anywhere you want while facing left, then team throw into it.
