Difference between revisions of "Jungle Hijinxs"
m (→101%) |
(added old summon tutorials for beginner 1.0 and general 1.1) (Tag: visualeditor-switched) |
||
| (28 intermediate revisions by 9 users not shown) | |||
| Line 7: | Line 7: | ||
| next = [[Ropey Rampage]] | | next = [[Ropey Rampage]] | ||
}} | }} | ||
| − | == | + | Difficulty: |
| − | {{#ev:youtube| | + | *Optimal: 4/10 |
| + | *101%: 3/10 | ||
| + | |||
| + | ==All Stages== | ||
| + | |||
| + | ===Safe=== | ||
| + | {{#ev:youtube|0pSHXaVvDU0|560||}} | ||
| + | *Sacrificing Donkey is faster than swapping manually, as you save time later by not having two Kongs on the world map. | ||
| + | *Rolling on or very close to a ledge will cause you to roll without losing height momentarily. Use this to cross small gaps at a higher speed. | ||
| + | *The roll across the Kritters' platforms at :08 requires an extended roll. You can skip it if you want, but it's a good introduction to what is the most important trick in this game. For this one, tap Y on the left side of the platform, making sure you don't slow down, then repress and hold Y as soon as as you grab the third banana. This should carry you all the way to the Necky section. | ||
| + | *If the roll stops around the halfway barrel, your timing or speed was off. Just jump up next to the Necky on top of the mountain and roll through him instead. His first two projectiles are bugged and can't hurt you on the first wave of three. | ||
| + | *Make sure you let go of Y while rolling through the barrel so that you do not grab it. | ||
| + | *Try your best to NOT grab the Expresso token here, as it's the only token in the game that is possible to accidentally grab three of and be sent to a long, unskippable bonus. | ||
| + | |||
| + | ===Optimal=== | ||
| + | {{#ev:youtube|WdSjy4XW488|560||this level is not so simple}} | ||
Notes: | Notes: | ||
| − | * | + | *Getting hit as you release the DK barrel is faster than sacrificing Donkey afterwards or swapping separately. |
| − | * | + | *Release the barrel as close to the Gnawty as possible. Ideally, you get hit and kill the Kremling on the same frame. But it is easy to die with this method, so generally you aim for a moment earlier. |
| − | + | *If the barrel kills the Gnawty instead of the Kremling, you let go too early. | |
| − | * | + | |
| + | The [[DKC_Tricks | Tricks]] page and the [[DKC1_Visuals | Visual Cues]] page have more information on techniques and visual cues if needed. | ||
| + | |||
| + | ===Triple Extendo Tutorial=== | ||
| + | [[File:jungle2.jpg|800px]] | ||
==101%== | ==101%== | ||
| + | ===Optimal=== | ||
| + | {{#ev:youtube|nVl0ijjW1R8|560||http://www.youtube.com/watch?v=nVl0ijjW1R8}} | ||
| + | Notes: | ||
| + | *Everything is the same as All Stages up to the Rambi crate. | ||
| + | *Hold forward while jumping onto Rambi in order to maintain your momentum afterwards. | ||
| + | *To dismount Rambi before entering the second bonus, let go of the D-Pad and tap A as soon as you see him begin to break it. | ||
| + | *Make sure you let go of Y after the second bonus ends to avoid bouncing on the hidden item below you. | ||
| + | *In general, for bonus exits, you want to hold right if you are shot out of a barrel, but hold both Y and right if you simply fall from the sky afterwards. | ||
| + | |||
| + | |||
| + | ==Old Summon== | ||
| + | ===Beginner=== | ||
| + | |||
| + | {{#ev:youtube|2L6iSqP2Pf4|560||}} | ||
| + | *If you did everything correctly but ended up in bouncy, you have the 1.1 version. | ||
| + | *If you did everything correctly and the nut from the necky in 1-1 kills donkey, you might have 1.2. | ||
| + | *If the game crashes when you leave the bonus, you probably threw the invis instead of placing it down. | ||
| + | *If the bonus doesn't open when you place the invis down, you probably loaded the sprites in the wrong order. | ||
| + | |||
| + | ===Optimal=== | ||
| − | + | {{#ev:youtube|MnHz2fxr8uI|560||Optimal and consistent warp for 1.0}} | |
| − | + | ===1.1 Version=== | |
| − | * | + | {{#ev:youtube|8HQnfgrUDT0|560||}} |
| + | *Stop where you collect the N and wait for the gnawty. | ||
| + | *Time it so the gnawty hits Donkey during the animation of him placing down the invis. | ||
| + | **If you're too early, you'll get sent to bouncy. | ||
| + | **If you're too late, your game will crash. | ||
Revision as of 01:04, 16 May 2018
 | |
| Game | Donkey Kong Country |
|---|---|
| World name | Kongo Jungle |
| Level name | Jungle Hijinxs |
| Previous level | None |
| Next level | Ropey Rampage |
Difficulty:
- Optimal: 4/10
- 101%: 3/10
Contents
All Stages
Safe
- Sacrificing Donkey is faster than swapping manually, as you save time later by not having two Kongs on the world map.
- Rolling on or very close to a ledge will cause you to roll without losing height momentarily. Use this to cross small gaps at a higher speed.
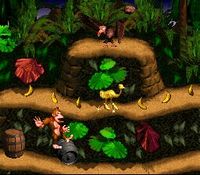
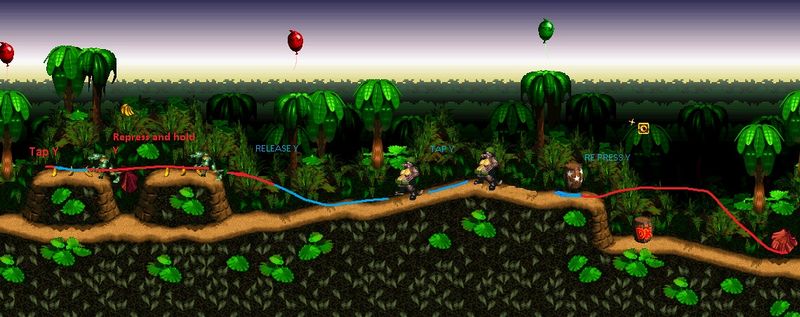
- The roll across the Kritters' platforms at :08 requires an extended roll. You can skip it if you want, but it's a good introduction to what is the most important trick in this game. For this one, tap Y on the left side of the platform, making sure you don't slow down, then repress and hold Y as soon as as you grab the third banana. This should carry you all the way to the Necky section.
- If the roll stops around the halfway barrel, your timing or speed was off. Just jump up next to the Necky on top of the mountain and roll through him instead. His first two projectiles are bugged and can't hurt you on the first wave of three.
- Make sure you let go of Y while rolling through the barrel so that you do not grab it.
- Try your best to NOT grab the Expresso token here, as it's the only token in the game that is possible to accidentally grab three of and be sent to a long, unskippable bonus.
Optimal
Notes:
- Getting hit as you release the DK barrel is faster than sacrificing Donkey afterwards or swapping separately.
- Release the barrel as close to the Gnawty as possible. Ideally, you get hit and kill the Kremling on the same frame. But it is easy to die with this method, so generally you aim for a moment earlier.
- If the barrel kills the Gnawty instead of the Kremling, you let go too early.
The Tricks page and the Visual Cues page have more information on techniques and visual cues if needed.
Triple Extendo Tutorial
101%
Optimal
Notes:
- Everything is the same as All Stages up to the Rambi crate.
- Hold forward while jumping onto Rambi in order to maintain your momentum afterwards.
- To dismount Rambi before entering the second bonus, let go of the D-Pad and tap A as soon as you see him begin to break it.
- Make sure you let go of Y after the second bonus ends to avoid bouncing on the hidden item below you.
- In general, for bonus exits, you want to hold right if you are shot out of a barrel, but hold both Y and right if you simply fall from the sky afterwards.
Old Summon
Beginner
- If you did everything correctly but ended up in bouncy, you have the 1.1 version.
- If you did everything correctly and the nut from the necky in 1-1 kills donkey, you might have 1.2.
- If the game crashes when you leave the bonus, you probably threw the invis instead of placing it down.
- If the bonus doesn't open when you place the invis down, you probably loaded the sprites in the wrong order.
Optimal
1.1 Version
- Stop where you collect the N and wait for the gnawty.
- Time it so the gnawty hits Donkey during the animation of him placing down the invis.
- If you're too early, you'll get sent to bouncy.
- If you're too late, your game will crash.
