Difference between revisions of "Kaos Karnage"
(→Optimal (J) TAS Kaos) |
(→Optimal (J) TAS Kaos) |
||
| Line 66: | Line 66: | ||
*[http://dkcspeedruns.com/DKC3_Tricks#Team_Up_Jump Team Up Jump] | *[http://dkcspeedruns.com/DKC3_Tricks#Team_Up_Jump Team Up Jump] | ||
*Since each team-up jump is a 1-frame input, this strategy is only worth going for if you can perform them consistently enough. | *Since each team-up jump is a 1-frame input, this strategy is only worth going for if you can perform them consistently enough. | ||
| − | *For the first three team up jumps, the timing is fairly generous: you need to have sufficient height when Kaos | + | *For the first three team up jumps, the timing is fairly generous: you just need to have sufficient height when Kaos' flame touches the ground. The fourth hit is more precise. |
*At 0:47, the jump is performed to make sure the fire won't hit Kiddy. | *At 0:47, the jump is performed to make sure the fire won't hit Kiddy. | ||
*If done perfectly, this method saves roughly 4.5 seconds over pseudo TAS Kaos. | *If done perfectly, this method saves roughly 4.5 seconds over pseudo TAS Kaos. | ||
Revision as of 00:33, 16 January 2019
 | |
| Game | Donkey Kong Country 3 |
|---|---|
| World name | Mekanos |
| Level name | Kaos Karnage |
| Previous level | Low-G Labyrinth |
| Next level | Bazza's Blockade |
Difficulty:
- Optimal (U) 2 Cycle: 6/10
- Optimal (U) 1 Cycle: 10/10
- Safe (J): 6/10
- Optimal (J) Deleted Kaos: 9/10
- Optimal (J) Pseudo TAS Kaos: 9.5/10
- Optimal (J) TAS Kaos: 10/10
Contents
Any%
Optimal (U) 2 Cycle
Notes:
- Doing Kaos this way does not work on J (please see the optimal J videos below)
- This version saves around 26.5 seconds over J safe.
- To perform this boss optimally you’ll need to perform the Team Throw Hovering trick
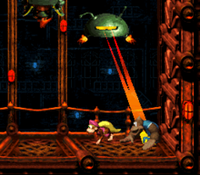
- To save time you'll want to start mashing when the flame from Kaos is parallel to the middle blue light in the background.
- Killing this boss in 2 cycles requires you to bounce on Kaos 4 times on the first phase (before the helmet shoots lasers) then 2 times after.
- For phase 2 you need to make sure that you’re close enough to his head so that you’ll hit him before he rises again (if you’re too high after bouncing on his head on the initial hit try to lower yourself when you team throw).
- Some small helpful tips when learning:
- For the first phase you’ll be bouncing once then throwing two times each time for 3 bounces, you should drop on top of him with relative ease each time except the last bounce in which you need to keep hovering for 5 throws until he moves over to you.
- For the second phase you’ll be bouncing once then team throwing two times after then the third you can throw Dixie over to the ground to secure the final hit.
Optimal (U) 1 Cycle
Notes:
- Team Throw Hovering
- Watch the video, as it contains an explanation of the setup + potential back-up strats.
- Again, this does not work on the Japanese version.
- Both the height and the direction of the team-throws are important to maximizing consistency.
- This method saves 13 - 15 seconds over a 2-cycle.
- NOTE - there is a mistake in the video about when to mash at the beginning of the fight. You want to mash when the red flame is parallel to the middle blue light, not the bottom one.
Safe (J)
Notes:
- Watch the video, as the first segment contains all the information you need to defeat this boss quickly.
- Although you cannot team throw hover on the Japanese version, you can still skip the 3rd cycle via a damage boost.
- Spawning the blades on the same side saves 1 second each, for a total of 5 seconds saved if you do this for every cycle.
- If you opt out of the 3rd same side blade to avoid dying you can still do the last 2 if you do the 3rd safe hit from the left side.
- If done perfectly, this boss is roughly 26.5 seconds slower on the Japanese version (compared to a 2-cycle KAOS on the North American version).
Optimal (J) Deleted Kaos
- Strategy found by Japanese TASer Deleted
- For visual cues on getting same side blades, watch the Safe (J) video.
- If done perfectly, this method saves roughly 15 seconds over the Safe (J) strategy.
Optimal (J) Pseudo TAS Kaos
- Team Up Jump
- This strategy for Kaos requires a team-up jump which is a 1-frame input.
- If done perfectly, this method saves roughly 5.5 seconds over the Deleted Kaos strategy, and some additional time in Bazza's Blockade from not having to grab a 2nd kong and swap.
Optimal (J) TAS Kaos
Notes:
- Team Up Jump
- Since each team-up jump is a 1-frame input, this strategy is only worth going for if you can perform them consistently enough.
- For the first three team up jumps, the timing is fairly generous: you just need to have sufficient height when Kaos' flame touches the ground. The fourth hit is more precise.
- At 0:47, the jump is performed to make sure the fire won't hit Kiddy.
- If done perfectly, this method saves roughly 4.5 seconds over pseudo TAS Kaos.