Difference between revisions of "Misty Mine"
| (18 intermediate revisions by 9 users not shown) | |||
| Line 8: | Line 8: | ||
}} | }} | ||
Difficulty: | Difficulty: | ||
| − | * | + | *Safe (Superjump): 2/10 |
| − | *Super Jumproll: | + | *Super Jumproll: 6/10 |
| − | * | + | *No Major Skips: 10/10 |
==All Stages== | ==All Stages== | ||
| − | === | + | |
| − | {{#ev:youtube| | + | ===Newbie Route (Superjump)=== |
| − | + | {{#ev:youtube|Yaerg8gcNpw|560||http://www.youtube.com/watch?v=Yaerg8gcNpw}} | |
| − | * | + | *Very slow alternative if you're having a really tough time with the level. |
| − | * | + | |
| − | * | + | ===Safe Route=== |
| − | * | + | {{#ev:youtube|p-ez9sN4Y9U|560||http://www.youtube.com/watch?v=p-ez9sN4Y9U}} |
| + | *This route avoids some tough rolls, risky jumps underneath the snakes, and the very precise jump over the very last pit at the end. | ||
| + | *You'll need to tap left for a moment to hit the third Army when doing the normal roll at the end. | ||
| + | |||
| + | ===Optimal SFR=== | ||
| + | {{#ev:youtube|JqXW4SS1avU|560||http://www.youtube.com/watch?v=JqXW4SS1avU}} | ||
| + | *With 4 baddies, this route is slightly slower than the SJR, but faster than playing the level normally. | ||
| + | *Setup is similar to SJR. When you superjump, hold B and Y, bounce off the snake and hold right which will cause you to grab the rope. if you got the insta-bounce, the game will eat your next Y input. You will need to let go of Y and repress it at some point in the air, or press down to crouch after you land on the can | ||
| + | *Careful not to bump off the wall as you rise so you don't lose speed. | ||
| + | *Visual cue if you hit 4 idiots is the snake can after the large gap after halfway. If you get 3 idiots it's the snake can right before the gap. | ||
| + | |||
| + | <div class="toccolours mw-collapsible mw-collapsed" style="width:600px"> | ||
| + | '''Alt SFR Setups''' | ||
| + | <div class="mw-collapsible-content"> | ||
| + | {{#ev:youtube|1i0LUvof_Z8|560||https://www.youtube.com/watch?v=1i0LUvof_Z8}} | ||
| + | *This is a slightly different setup that is less precise at a small time cost. | ||
| + | *You don't lose your extendo in an SFR state, so you store your snake boost to release after you corner. | ||
| + | |||
| + | {{#ev:youtube|J1lbsEzcRIk|560||https://youtu.be/J1lbsEzcRIk}} | ||
| + | *Tutorial for an easy and consistent SFR. Start with this as your basic setup | ||
| + | *Holding left and rolling immediately off the can cuts out a lot of waiting time compared to other setups | ||
| + | |||
| + | {{#ev:youtube|o4TejFqHC8w|560||https://www.youtube.com/watch?v=o4TejFqHC8w&feature=youtu.be}} | ||
| + | *Slower than other setups. | ||
| + | *Easier and is a guaranteed 3 idiot roll. | ||
| + | </div> | ||
| + | </div> | ||
===Optimal (Super Jumproll)=== | ===Optimal (Super Jumproll)=== | ||
{{#ev:youtube|aGT-HA01zZE|560||https://www.youtube.com/https://www.youtube.com/watch?v=aGT-HA01zZE}} | {{#ev:youtube|aGT-HA01zZE|560||https://www.youtube.com/https://www.youtube.com/watch?v=aGT-HA01zZE}} | ||
Notes: | Notes: | ||
| − | * | + | *To do this [[DKC_Tricks#Super_Jumproll | SJR]], you must release Y within 5 frames after pressing it while holding B, tap Y again to extendo off the snake, then press and hold it when you are over the ledge that you started on. |
| − | * | + | *If done correctly, you will roll through a third snake to get a faster SJR. (Hitting the fourth one is effectively TAS only.) |
| − | * | + | *Release B when the first banana after the halfway barrel touches the left side of the screen. If you missed the third snake, you'll have to release earlier. |
| + | <div class="toccolours mw-collapsible mw-collapsed" style="width:600px"> | ||
| + | '''When to release B''' | ||
| + | <div class="mw-collapsible-content"> | ||
| + | {{#ev:youtube|QEf2J8NsjHc|560|}} | ||
| + | Notes: | ||
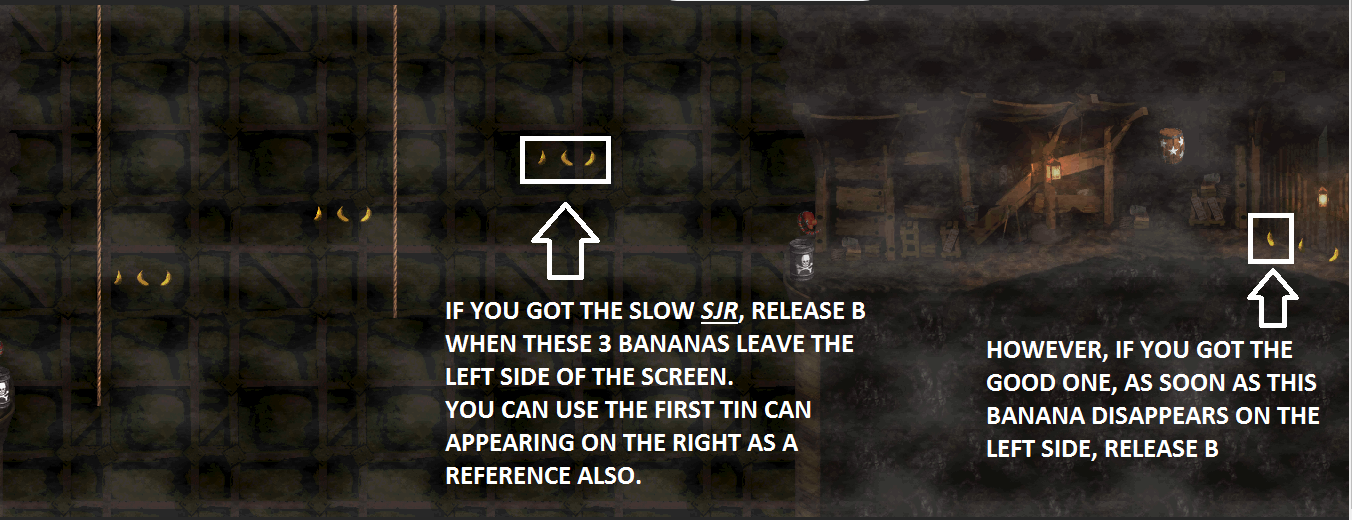
| + | * If you happen to get the slow SJR, refer to the video above (or the image below) to know where to release B. | ||
| + | [[File:MistySJR.png]] | ||
| + | </div> | ||
| + | </div> | ||
| − | == | + | ===No Major Skips=== |
| − | + | {{#ev:youtube|IIG3FsmHCFw|560||}} | |
| − | {{#ev:youtube| | ||
Notes: | Notes: | ||
| − | *This | + | *At :07, make sure you roll early before reaching the edge where the rope is. Rolling on the edge will cause you to teleport back to the rope. On this stage, it can actually cause you to clip out of bounds and die. |
| + | *This level is full of walls and Dumb Drums that you can get stuck on. It takes quite a bit of time to get the feel of good movement down in this stage. Heavy practice is recommended. | ||
| + | *The roll at :18 is tight. Too early and you grab the TNT barrel; too late and your roll dies as you hit the ground, causing you to get hit. Starting your roll as far away from the ledge, while also not grabbing the TNT barrel makes this roll consistent | ||
| + | *The jump at :54 is quite difficult and nerve-wracking during a good run. To make this jump a lot easier, simply release d-pad for an instant as soon as you see the final Army spawn. | ||
Revision as of 21:49, 3 February 2020
 | |
| Game | Donkey Kong Country |
|---|---|
| World name | Chimp Caverns |
| Level name | Misty Mine |
| Previous level | Manic Mincers |
| Next level | Loopy Lights |
Difficulty:
- Safe (Superjump): 2/10
- Super Jumproll: 6/10
- No Major Skips: 10/10
Contents
All Stages
Newbie Route (Superjump)
- Very slow alternative if you're having a really tough time with the level.
Safe Route
- This route avoids some tough rolls, risky jumps underneath the snakes, and the very precise jump over the very last pit at the end.
- You'll need to tap left for a moment to hit the third Army when doing the normal roll at the end.
Optimal SFR
- With 4 baddies, this route is slightly slower than the SJR, but faster than playing the level normally.
- Setup is similar to SJR. When you superjump, hold B and Y, bounce off the snake and hold right which will cause you to grab the rope. if you got the insta-bounce, the game will eat your next Y input. You will need to let go of Y and repress it at some point in the air, or press down to crouch after you land on the can
- Careful not to bump off the wall as you rise so you don't lose speed.
- Visual cue if you hit 4 idiots is the snake can after the large gap after halfway. If you get 3 idiots it's the snake can right before the gap.
Alt SFR Setups
- This is a slightly different setup that is less precise at a small time cost.
- You don't lose your extendo in an SFR state, so you store your snake boost to release after you corner.
- Tutorial for an easy and consistent SFR. Start with this as your basic setup
- Holding left and rolling immediately off the can cuts out a lot of waiting time compared to other setups
- Slower than other setups.
- Easier and is a guaranteed 3 idiot roll.
Optimal (Super Jumproll)
Notes:
- To do this SJR, you must release Y within 5 frames after pressing it while holding B, tap Y again to extendo off the snake, then press and hold it when you are over the ledge that you started on.
- If done correctly, you will roll through a third snake to get a faster SJR. (Hitting the fourth one is effectively TAS only.)
- Release B when the first banana after the halfway barrel touches the left side of the screen. If you missed the third snake, you'll have to release earlier.
When to release B
No Major Skips
Notes:
- At :07, make sure you roll early before reaching the edge where the rope is. Rolling on the edge will cause you to teleport back to the rope. On this stage, it can actually cause you to clip out of bounds and die.
- This level is full of walls and Dumb Drums that you can get stuck on. It takes quite a bit of time to get the feel of good movement down in this stage. Heavy practice is recommended.
- The roll at :18 is tight. Too early and you grab the TNT barrel; too late and your roll dies as you hit the ground, causing you to get hit. Starting your roll as far away from the ledge, while also not grabbing the TNT barrel makes this roll consistent
- The jump at :54 is quite difficult and nerve-wracking during a good run. To make this jump a lot easier, simply release d-pad for an instant as soon as you see the final Army spawn.
