Mudhole Marsh
Revision as of 08:53, 2 January 2016 by Newpants87 (talk | contribs)
 | |
| Game | Donkey Kong Country 2 |
|---|---|
| World name | Krazy Kremland |
| Level name | Mudhole Marsh |
| Previous level | Rickety Race |
| Next level | Rambi Rumble |
Difficulty:
- Safe: 6/10
- Optimal (Manhole): 10/10
Contents
Any%
Safe
Notes
- Uses Invisible Barrel and Beetle Clashing to perform the Wrong Warp.
- If you struggle with the Wrong Warp but feel like warpless is shameful, there is an easy method that uses Dixie near the bottom of the page.
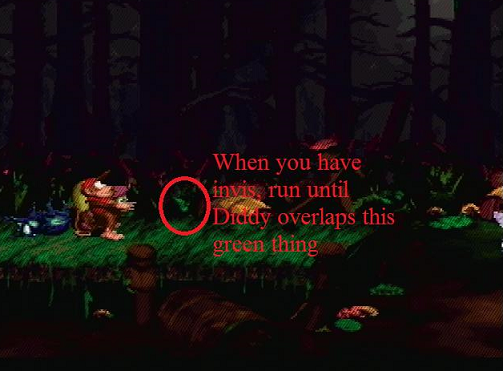
- Proceed through the invincibility section however you see fit.
WRONG WARP TUTORIAL
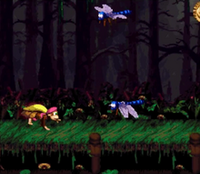
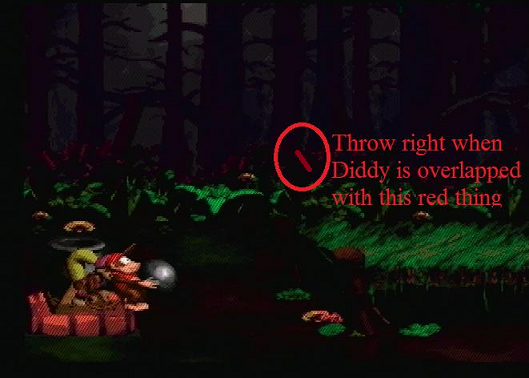
- This is the most important part; it will dictate whether or not you will actually get the trick. There are three beetles on the platform which are walking towards you. The first beetle has an ID1, the 2nd ID2, and the 3rd ID3. The goal is to ensure that the 3rd beetle spawns as ID4; this is where the cannonball comes into play. When the cannonball hits the beetle, the damage sprite will temporarily take the next available ID. For instance, if you've ONLY just seen the first two beetles and haven't loaded the 3rd one (it hasn't walked onto the screen), the damage sprite will take ID3, resulting in the next beetle having ID4. Thus, the throw ensures that the cannonball hits the first beetle BEFORE the 3rd beetle comes onto the screen.
- If you're having troubles, there are two main reasons. After the initial throw, moving in too slow or too quickly to the right will not give the 3rd beetle its proper ID. Going in right as the cannonball connects is a good cue.
Beetle Clash
- Just clash roughly where the cannonball is. There isn't a strict position of where you need to be.
- Once you have it, walk far enough to the right so you can see the mosquito on the right side of the screen.
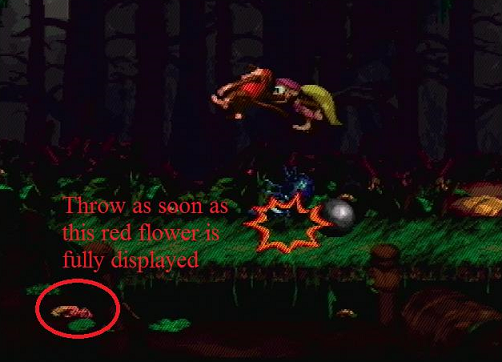
- There really is no precision on how far left you go in the air, just make sure that the red flower is on the screen and throw the invisible barrel to the left. Additionally, Like other wrong warps, you want to minimize the amount of times you press "right". Land on the beetle to kill it, tap right to just grab the cannonball and then just walk into the cannon.
Additional Info
- If you still can't do the Diddy wrong warp, then you can check out this video on throws. It demonstrates good throws/movement vs bad throws/early beetle loading.
- There is a VERY BIG emphasis on getting the throw correct in the beginning, otherwise the IDs won't align and you will miss the trick.
- If you still have trouble with the wrong warp, get the DKC2 Lua ID Script and play with the timing yourself.
Optimal (Manhole)
Additions
- At 0:09 (1st eagle pit), roll into the water under the 2nd platform, then roll across the next platforms. (Saves ~.45s).
- At 0:18, roll over the gap between the 2 platforms instead of jumping over it. A good way to be consistent with this is to let go of the d-pad for a split second before landing on the first platform (Saves ~.25s).
- For the 2nd eagle pit right after, do not take the invincibility barrel. Instead, do as shown above (Saves ~4s).
- If you are not comfortable with this method, but feel that taking the invincibility is too slow, go to the More Strats section below.
- At 0:25, roll from the very edge into the Flitter, and then into the water. Jump out and try to avoid grabbing the chest (Saves ~.65s, or ~.5s with the chest).
- At 0:32, it is possible to not use the jump button on the eagles and still make it. If you want to be semi-safe, only jump on the last one. (Saves ~.1s to ~.2s, depending on how often you jump).
- At 0:38, manipulate the camera by performing the Klosty wiggle. This will allow you to skip waiting a barrel cycle while carrying the cannonball (Saves ~.75s).
(Alternative to Klosty wiggle can be done with a moonwalk - hasn't been frame counted to be slower or faster [1])
- Note that the wrong warp setup shown here cuts corners in order to be optimal.
MORE STRATS
- For RNG roll, simply roll down to the platforms below. Note that this is prone to failure, and a lot of players opt out of it (Saves ~.2s).
- The other strats are NOT faster than in the optimal video; they are a good middle ground between safety and speed.
- For the 1st eagle pit, roll under the 3rd platform (Saves ~.2s over safe, loses ~.2s over optimal).
- For the 2nd eagle pit, jump onto the two Mini Neckys at the beginning (Loses ~.15s over optimal). At the end, jump onto the final Mini Necky, instead of jumping over him (Loses ~.25s over optimal). Overall, this is still much faster than taking the invincibility barrel.
- For the midpoint section, roll over the gap between the platforms and avoid grabbing the chest after (Saves ~.4s over safe, loses ~.25s over optimal).
DIXIE WRONG WARP TUTORIAL (BY CRYPTICJACKNIFE)
Things That Matter
- The Cannonball - Grab it on your way through and meander on over to the other side of the cannon. If you aren't consistent with jumping onto the cannon platform without activating it, you can always just jump above it and throw it onto the platform, it'll make it and it won't screw it up. What is imperative though is that the cannonball MUST be at least halfway across the platform, so you need to kind of chance it by throwing it.
- The Three Beetles - Run as far onto the platform as you can, kill the first with your cannonball, then jump on third, and swap to Dixie as soon as you hit the ground. Grab the one you just knocked down and clash it with the other. Now they will be reset. Run into the one you aren't holding when it is recovering and you will be holding nothing.
- The Throw - You want the cannon to be off screen as much as possible during this whole trick. Go to just left of the cannonball, turn left, throw. No need to swap to Diddy to get the trick working, but it is better to have Diddy in front for Rambi Rumble.


