Difference between revisions of "Screech's Sprint"
Cryptonberry (talk | contribs) |
m |
||
| (6 intermediate revisions by one other user not shown) | |||
| Line 14: | Line 14: | ||
==Any%== | ==Any%== | ||
===Safe=== | ===Safe=== | ||
| − | {{#ev:youtube| | + | {{#ev:youtube|0FGZLMTSnyw|560||https://www.youtube.com/watch?v=0FGZLMTSnyw}} |
'''Notes''' | '''Notes''' | ||
*Grabbing the halfway barrel after transforming into Squawks is a bit faster if you were to die. | *Grabbing the halfway barrel after transforming into Squawks is a bit faster if you were to die. | ||
| − | *The race skip is the biggest trick in this level. When approaching Screech, hit Up-Right+B to reach over Screech and then Down-Left+B to navigate past the race trigger (Saves ~1. | + | *The race skip is the biggest trick in this level. When approaching Screech, hit Up-Right+B to reach over Screech and then Down-Left+B to navigate past the race trigger (Saves ~1.3s). |
**If you were too high, you will get hit but damage boosting will make you skip the race anyway. Too low will trigger the race. | **If you were too high, you will get hit but damage boosting will make you skip the race anyway. Too low will trigger the race. | ||
| Line 24: | Line 24: | ||
'''Additions''' | '''Additions''' | ||
*Do not grab the DK Barrel at the beginning of the stage, as grabbing it a bit later with Squawks is faster (no freeze frames). | *Do not grab the DK Barrel at the beginning of the stage, as grabbing it a bit later with Squawks is faster (no freeze frames). | ||
| − | |||
*At 0:07, despawn the Kloak so you can reach the ropes. Jumping over the bee and skipping the chest after is a bit tricky, but simple after some practice (Saves ~.3s by itself, but ~.9s accounting for the DK barrel skip). | *At 0:07, despawn the Kloak so you can reach the ropes. Jumping over the bee and skipping the chest after is a bit tricky, but simple after some practice (Saves ~.3s by itself, but ~.9s accounting for the DK barrel skip). | ||
| − | *At 0:35, you must skip the leftmost automatic barrel to make the Fanfare Skip at the end of the level consistent (Saves ~. | + | *At 0:35, you must skip the leftmost automatic barrel to make the Fanfare Skip at the end of the level consistent (Saves ~.6s overall). |
**Note that you must stay low in the upcoming section. [https://www.youtube.com/watch?v=iqJUr9J568Y Claude's explanation.] | **Note that you must stay low in the upcoming section. [https://www.youtube.com/watch?v=iqJUr9J568Y Claude's explanation.] | ||
*At 0:49, do not wait for the bee ring cycle. Just go for it. | *At 0:49, do not wait for the bee ring cycle. Just go for it. | ||
**There are a number of ways to perform this (see More Strats section). | **There are a number of ways to perform this (see More Strats section). | ||
| + | |||
| + | <div class="toccolours mw-collapsible mw-collapsed" style="width:600px"> | ||
| + | '''HITBOXES''' | ||
| + | <div class="mw-collapsible-content"> | ||
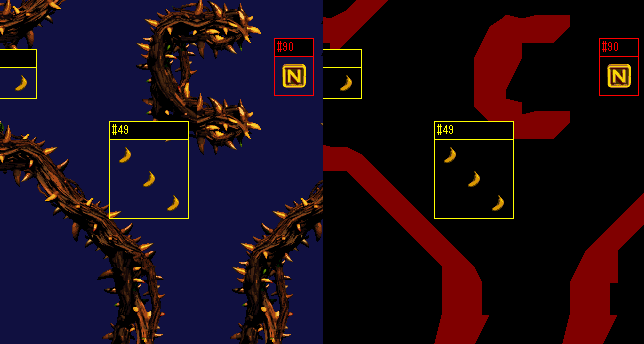
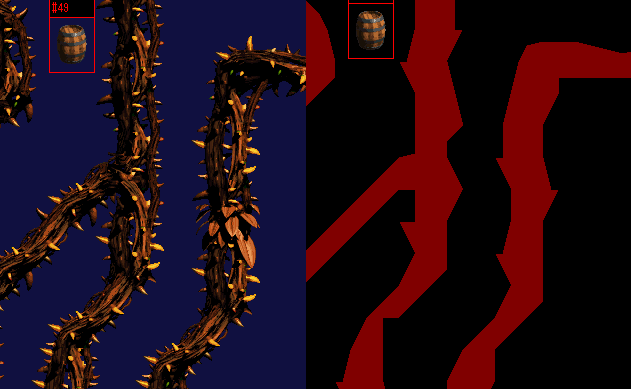
| + | **There are several spots where the brambles hitbox is deceiving and actually sticks out. Here's 2 examples. | ||
| + | [[File:Bramble_1.png]] | ||
| + | *After the bee ring skip and before the bee maze. | ||
| + | *the corner here has the hitbox stick out, only way to avoid it is by not doing an optimal corner. | ||
| + | [[File:Bramble_2.png]] | ||
| + | *The final corridor of the level. | ||
| + | *The hitbox sticks out on the left and right side. Proceed with caution. | ||
| + | </div> | ||
| + | </div> | ||
<div class="toccolours mw-collapsible mw-collapsed" style="width:600px"> | <div class="toccolours mw-collapsible mw-collapsed" style="width:600px"> | ||
'''MORE STRATS''' | '''MORE STRATS''' | ||
| − | <div class="mw-collapsible-content">{{#ev:youtube| | + | <div class="mw-collapsible-content">{{#ev:youtube|8Mzq8vOuHdY|560||https://www.youtube.com/watch?v=8Mzq8vOuHdY}} |
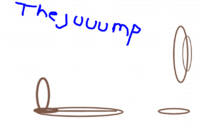
*[http://i.imgur.com/32I9bgB.png TheJuuump] (Saves ~.8s). | *[http://i.imgur.com/32I9bgB.png TheJuuump] (Saves ~.8s). | ||
*Krauser jump goes straight under the Mini-Necky, instead of climbing the rope all the way (Saves ~.3s). | *Krauser jump goes straight under the Mini-Necky, instead of climbing the rope all the way (Saves ~.3s). | ||
| − | |||
</div> | </div> | ||
</div> | </div> | ||
| Line 42: | Line 53: | ||
<div class="toccolours mw-collapsible mw-collapsed" style="width:600px"> | <div class="toccolours mw-collapsible mw-collapsed" style="width:600px"> | ||
'''BACKUPS''' | '''BACKUPS''' | ||
| − | <div class="mw-collapsible-content">{{#ev:youtube| | + | <div class="mw-collapsible-content">{{#ev:youtube|Y3aydangnkg|560||https://www.youtube.com/watch?v=Y3aydangnkg}} |
| − | |||
'''Notes''' | '''Notes''' | ||
*Fake Bee Ring skip uses the invincibility frames to clear the bees, without any fancy maneuvers. | *Fake Bee Ring skip uses the invincibility frames to clear the bees, without any fancy maneuvers. | ||
Revision as of 20:18, 27 February 2019
 | |
| Game | Donkey Kong Country 2 |
|---|---|
| World name | The Flying Krock |
| Level name | Screech's Sprint |
| Previous level | Stronghold Showdown |
| Next level | K. Rool Duel |
Difficulty:
- Safe: 7/10
- Optimal: 9/10
- If you're on The Urn: 20/10
Any%
Safe
Notes
- Grabbing the halfway barrel after transforming into Squawks is a bit faster if you were to die.
- The race skip is the biggest trick in this level. When approaching Screech, hit Up-Right+B to reach over Screech and then Down-Left+B to navigate past the race trigger (Saves ~1.3s).
- If you were too high, you will get hit but damage boosting will make you skip the race anyway. Too low will trigger the race.
Optimal
Additions
- Do not grab the DK Barrel at the beginning of the stage, as grabbing it a bit later with Squawks is faster (no freeze frames).
- At 0:07, despawn the Kloak so you can reach the ropes. Jumping over the bee and skipping the chest after is a bit tricky, but simple after some practice (Saves ~.3s by itself, but ~.9s accounting for the DK barrel skip).
- At 0:35, you must skip the leftmost automatic barrel to make the Fanfare Skip at the end of the level consistent (Saves ~.6s overall).
- Note that you must stay low in the upcoming section. Claude's explanation.
- At 0:49, do not wait for the bee ring cycle. Just go for it.
- There are a number of ways to perform this (see More Strats section).
HITBOXES
- There are several spots where the brambles hitbox is deceiving and actually sticks out. Here's 2 examples.
- After the bee ring skip and before the bee maze.
- the corner here has the hitbox stick out, only way to avoid it is by not doing an optimal corner.
- The final corridor of the level.
- The hitbox sticks out on the left and right side. Proceed with caution.
MORE STRATS
- TheJuuump (Saves ~.8s).
- Krauser jump goes straight under the Mini-Necky, instead of climbing the rope all the way (Saves ~.3s).
BACKUPS
Notes
- Fake Bee Ring skip uses the invincibility frames to clear the bees, without any fancy maneuvers.

