Difference between revisions of "Slime Climb"
m |
(→Safe) |
||
| (17 intermediate revisions by 5 users not shown) | |||
| Line 7: | Line 7: | ||
| next = [[Bramble Blast]] | | next = [[Bramble Blast]] | ||
}} | }} | ||
| − | Difficulty: 5/10 | + | Difficulty: |
| + | *Safe: 5/10 | ||
| + | *Optimal: 6/10 | ||
==Any%== | ==Any%== | ||
| − | === | + | ===Safe=== |
| − | {{#ev:youtube| | + | {{#ev:youtube|01ikN3iOoQQ|560||https://www.youtube.com/watch?v=01ikN3iOoQQ}} |
| − | + | *Uses [[DKC2 Tricks#Damage_Boosting | Damage Boosting]], [[DKC2 Tricks#Invisible_Barrel | Invisible Barrel]], and [[DKC2 Tricks#Beetle_Clashing | Beetle Clashing]] to perform the [[DKC2 Tricks#Wrong_Warp | Wrong Warp]]. | |
| − | *Uses [[Tricks#Damage_Boosting | Damage Boosting]], [[Tricks#Invisible_Barrel | Invisible Barrel]], and [[Tricks#Beetle_Clashing | Beetle Clashing]] to perform the [[Tricks#Wrong_Warp | Wrong Warp]]. | + | *On the platform where you get the invis, you want to load the right beetle on camera first to set up the IDs. |
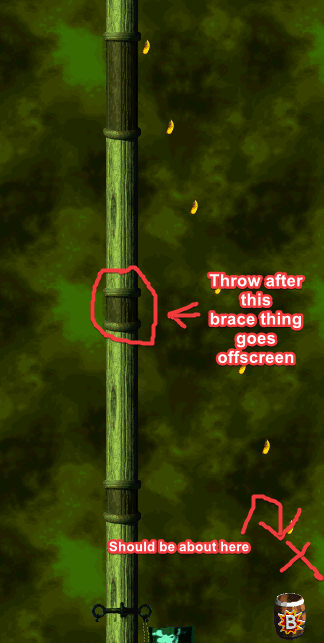
*The final throw is tricky, as you need to be somewhat close to the bonus. | *The final throw is tricky, as you need to be somewhat close to the bonus. | ||
| − | + | **Throwing a little bit after you touch the wall is a good visual cue for the final throw. | |
| − | |||
| − | |||
| − | |||
| − | |||
| − | |||
| − | |||
| − | |||
| − | |||
<div class="toccolours mw-collapsible mw-collapsed" style="width:600px"> | <div class="toccolours mw-collapsible mw-collapsed" style="width:600px"> | ||
| − | ''' | + | '''ALTERNATIVE VISUAL CUE''' |
<div class="mw-collapsible-content"> | <div class="mw-collapsible-content"> | ||
| − | + | [[File:slimbclimevisual.png]] | |
| − | |||
| − | |||
</div> | </div> | ||
</div> | </div> | ||
| − | |||
<div class="toccolours mw-collapsible mw-collapsed" style="width:600px"> | <div class="toccolours mw-collapsible mw-collapsed" style="width:600px"> | ||
'''WATER SWAP TUTORIAL''' | '''WATER SWAP TUTORIAL''' | ||
<div class="mw-collapsible-content"> | <div class="mw-collapsible-content"> | ||
| − | [[File:sc1.jpg]] | + | [[File:sc1.jpg|588px]] |
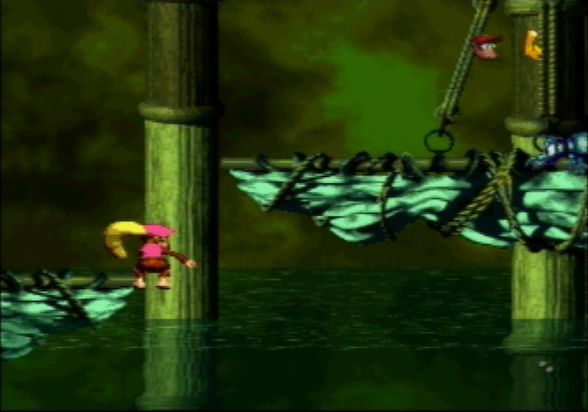
*Roll off the edge with Dixie. | *Roll off the edge with Dixie. | ||
| − | [[File:sc2.jpg]] | + | [[File:sc2.jpg|588px]] |
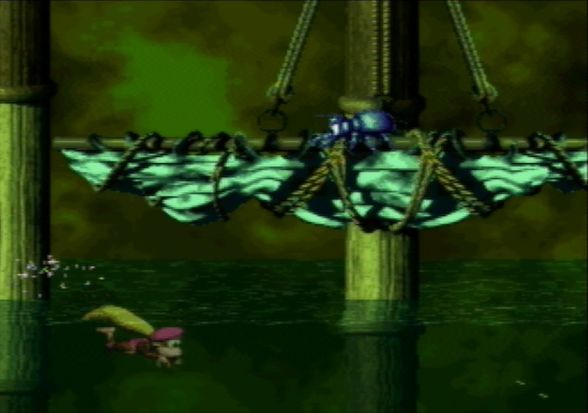
*Once Dixie is in the water, hold Y and Up-Right. Press B once to swim upwards. | *Once Dixie is in the water, hold Y and Up-Right. Press B once to swim upwards. | ||
| − | [[File:sc3.jpg]] | + | [[File:sc3.jpg|588px]] |
*If done properly, Dixie will be at the top of the water. | *If done properly, Dixie will be at the top of the water. | ||
| − | [[File:sc4.jpg]] | + | [[File:sc4.jpg|588px]] |
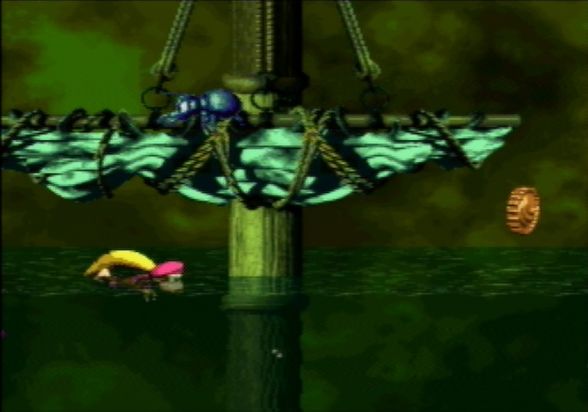
*At this point, press select to switch Kongs. | *At this point, press select to switch Kongs. | ||
| − | [[File:sc5.jpg]] | + | [[File:sc5.jpg|588px]] |
*After pressing select, you want to be holding Y and Up-Right. You can mash B to ensure you get the jump on time, but the fish shouldn't be able to hurt you anyway. | *After pressing select, you want to be holding Y and Up-Right. You can mash B to ensure you get the jump on time, but the fish shouldn't be able to hurt you anyway. | ||
| − | [[File:sc6.jpg]] | + | [[File:sc6.jpg|588px]] |
*Success! | *Success! | ||
| Line 64: | Line 55: | ||
</div> | </div> | ||
| + | <div class="toccolours mw-collapsible mw-collapsed" style="width:600px"> | ||
| + | '''TWIG'S TUTORIAL''' | ||
| + | <div class="mw-collapsible-content"> | ||
| + | {{#ev:youtube|9df1u37DPYw|560||http://www.youtube.com/watch?v=9df1u37DPYw}} | ||
| + | '''Notes''' | ||
| + | *The water swap used in this video is outdated, but still viable. With a little practice, most players find the optimal water swap much easier overall, since it requires no mashing. | ||
| + | </div> | ||
| + | </div> | ||
| + | |||
| + | ===Optimal=== | ||
| + | {{#ev:youtube|5_D8kzjkEdY|560||https://www.youtube.com/watch?v=5_D8kzjkEdY}} | ||
| + | '''Additions''' | ||
| + | *Some extra rope jumps and trickier movement included over the safe tape. | ||
| + | *At 0:23, cut the corner as close as possible with this jump (Saves ~.1s) | ||
| + | **You'll need to throw a little sooner than you would without the jump if you're using the wall as your cue. With an optimal jump, throw as soon as you hit the wall. | ||
<div class="toccolours mw-collapsible mw-collapsed" style="width:600px"> | <div class="toccolours mw-collapsible mw-collapsed" style="width:600px"> | ||
'''MORE STRATS''' | '''MORE STRATS''' | ||
<div class="mw-collapsible-content"> | <div class="mw-collapsible-content"> | ||
| − | {{#ev:youtube| | + | {{#ev:youtube|LYuImgFNqDE|560||https://www.youtube.com/watch?v=LYuImgFNqDE}} |
| − | * | + | *Jumping to the left without loading the right beetle is faster, but is prone to random failures. Use these setups at your own risk (Saves ~1.1s). |
</div> | </div> | ||
</div> | </div> | ||
| − | + | <div class="toccolours mw-collapsible mw-collapsed" style="width:600px"> | |
| − | + | '''BACKUPS''' | |
| − | = | + | <div class="mw-collapsible-content"> |
| − | {{#ev:youtube| | + | {{#ev:youtube|r1hbvVTQFIY|560||https://www.youtube.com/watch?v=r1hbvVTQFIY}} |
'''Notes''' | '''Notes''' | ||
| − | *If you lose a Kong attempting to team swap in water, you still have | + | *If you lose a Kong attempting to team swap in water or accidentally enter the level with only 1 Kong, you still have a shot at getting the wrong warp! |
*You can wait and lure out the fish further to the right before diving in and swapping, for more safety. Do what you feel is comfortable to juke him. | *You can wait and lure out the fish further to the right before diving in and swapping, for more safety. Do what you feel is comfortable to juke him. | ||
*To get the damage boost properly, make sure you swim to the top of the water before the fish attacks you. Swimming up before swapping can also increase your rate of success. | *To get the damage boost properly, make sure you swim to the top of the water before the fish attacks you. Swimming up before swapping can also increase your rate of success. | ||
*You can damage boost with the beetle on the platform too. The result is the same. | *You can damage boost with the beetle on the platform too. The result is the same. | ||
| − | |||
| − | |||
*The other video demonstrates how the warp can be performed with Diddy, if you lose a Kong climbing the ropes. | *The other video demonstrates how the warp can be performed with Diddy, if you lose a Kong climbing the ropes. | ||
| − | + | </div> | |
| − | + | </div> | |
| − | |||
[[Category:Krem Quay]] | [[Category:Krem Quay]] | ||
[[Category:Level]] | [[Category:Level]] | ||
Revision as of 02:58, 16 March 2019
 | |
| Game | Donkey Kong Country 2 |
|---|---|
| World name | Krem Quay |
| Level name | Slime Climb |
| Previous level | Rattle Battle |
| Next level | Bramble Blast |
Difficulty:
- Safe: 5/10
- Optimal: 6/10
Any%
Safe
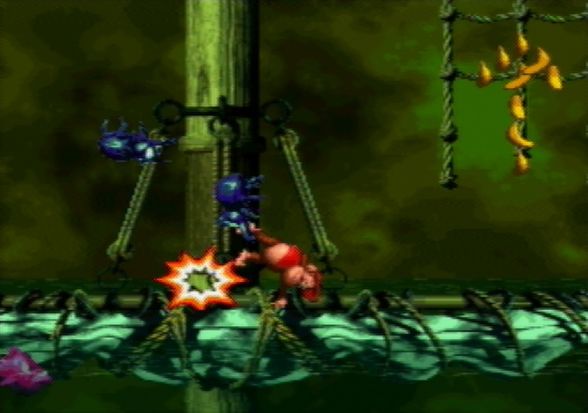
- Uses Damage Boosting, Invisible Barrel, and Beetle Clashing to perform the Wrong Warp.
- On the platform where you get the invis, you want to load the right beetle on camera first to set up the IDs.
- The final throw is tricky, as you need to be somewhat close to the bonus.
- Throwing a little bit after you touch the wall is a good visual cue for the final throw.
WATER SWAP TUTORIAL
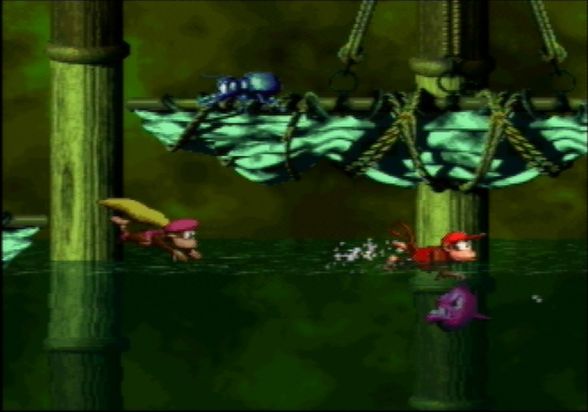
- Roll off the edge with Dixie.
- Once Dixie is in the water, hold Y and Up-Right. Press B once to swim upwards.
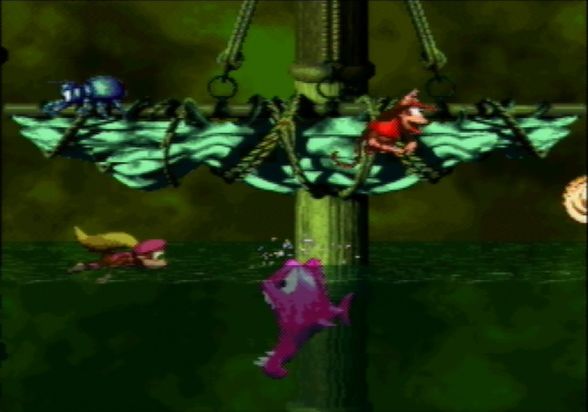
- If done properly, Dixie will be at the top of the water.
- At this point, press select to switch Kongs.
- After pressing select, you want to be holding Y and Up-Right. You can mash B to ensure you get the jump on time, but the fish shouldn't be able to hurt you anyway.
- Success!
TWIG'S TUTORIAL
Notes
- The water swap used in this video is outdated, but still viable. With a little practice, most players find the optimal water swap much easier overall, since it requires no mashing.
Optimal
Additions
- Some extra rope jumps and trickier movement included over the safe tape.
- At 0:23, cut the corner as close as possible with this jump (Saves ~.1s)
- You'll need to throw a little sooner than you would without the jump if you're using the wall as your cue. With an optimal jump, throw as soon as you hit the wall.
MORE STRATS
- Jumping to the left without loading the right beetle is faster, but is prone to random failures. Use these setups at your own risk (Saves ~1.1s).
BACKUPS
Notes
- If you lose a Kong attempting to team swap in water or accidentally enter the level with only 1 Kong, you still have a shot at getting the wrong warp!
- You can wait and lure out the fish further to the right before diving in and swapping, for more safety. Do what you feel is comfortable to juke him.
- To get the damage boost properly, make sure you swim to the top of the water before the fish attacks you. Swimming up before swapping can also increase your rate of success.
- You can damage boost with the beetle on the platform too. The result is the same.
- The other video demonstrates how the warp can be performed with Diddy, if you lose a Kong climbing the ropes.
