Difference between revisions of "Web Woods"
Cryptonberry (talk | contribs) m |
m (→Intermediate) |
||
| (4 intermediate revisions by 3 users not shown) | |||
| Line 16: | Line 16: | ||
'''Notes''' | '''Notes''' | ||
*Do not be fooled, the safe route is still hard. It does however use a lot of extra platforms, and avoids all the damage boosts. | *Do not be fooled, the safe route is still hard. It does however use a lot of extra platforms, and avoids all the damage boosts. | ||
| − | *[[Tricks#Squitter_Instant_Platforms | Instant Platforms]] will need to be practiced before you can be consistent at this stage, no matter the route. | + | *[[DKC2 Tricks#Squitter_Instant_Platforms | Instant Platforms]] will need to be practiced before you can be consistent at this stage, no matter the route. |
**Getting the proper feel for good platforms takes a while. The main mistake is usually making it too late, which is typically an instant death. | **Getting the proper feel for good platforms takes a while. The main mistake is usually making it too late, which is typically an instant death. | ||
| Line 25: | Line 25: | ||
*There's a cooldown between creating instant platforms with Squitter. To optimally work around this cooldown, briefly let go of the Dpad when creating consecutive instant platforms. Note that the final 2 instant platforms of the level don't have a cooldown, so not letting go of the Dpad is viable in that instance. The final instant platform at Up in 3 after midway also has no cooldown. | *There's a cooldown between creating instant platforms with Squitter. To optimally work around this cooldown, briefly let go of the Dpad when creating consecutive instant platforms. Note that the final 2 instant platforms of the level don't have a cooldown, so not letting go of the Dpad is viable in that instance. The final instant platform at Up in 3 after midway also has no cooldown. | ||
*Before the Squitter section, use the bottom path and roll through the rats. The purple flower before the TNT Klobber is a good cue for where to roughly jump from. | *Before the Squitter section, use the bottom path and roll through the rats. The purple flower before the TNT Klobber is a good cue for where to roughly jump from. | ||
| − | *The two [[Tricks#Animal_Damage_Boost | Squitter damage boosts]] will require practice before you can tackle this route. | + | *The two [[DKC2 Tricks#Animal_Damage_Boost | Squitter damage boosts]] will require practice before you can tackle this route. |
**A good visual cue for this would be the damage star sprite: jump as soon as it disappears (note that cues of the sort are different from what platform you play the game on, and other input lag variables). | **A good visual cue for this would be the damage star sprite: jump as soon as it disappears (note that cues of the sort are different from what platform you play the game on, and other input lag variables). | ||
*At 1:13, the banana coin on the screen is a good point of reference to know how close your web is to the platform. | *At 1:13, the banana coin on the screen is a good point of reference to know how close your web is to the platform. | ||
| − | + | *[https://youtu.be/R-X1Zy5Km_k Alternative safe eagle pit strat] | |
| + | *[https://youtu.be/0K8ph5muT6E Another alternative that avoids repressing Y] | ||
===Optimal=== | ===Optimal=== | ||
| Line 40: | Line 41: | ||
**You can also manually create the last web. It is safer, but an extra input is needed. | **You can also manually create the last web. It is safer, but an extra input is needed. | ||
*At 1:10 is Leap of Faith: jump before your platform is created. Once again, you can time an auto-platform or manually input the web formation. | *At 1:10 is Leap of Faith: jump before your platform is created. Once again, you can time an auto-platform or manually input the web formation. | ||
| − | + | ||
<div class="toccolours mw-collapsible mw-collapsed" style="width:600px"> | <div class="toccolours mw-collapsible mw-collapsed" style="width:600px"> | ||
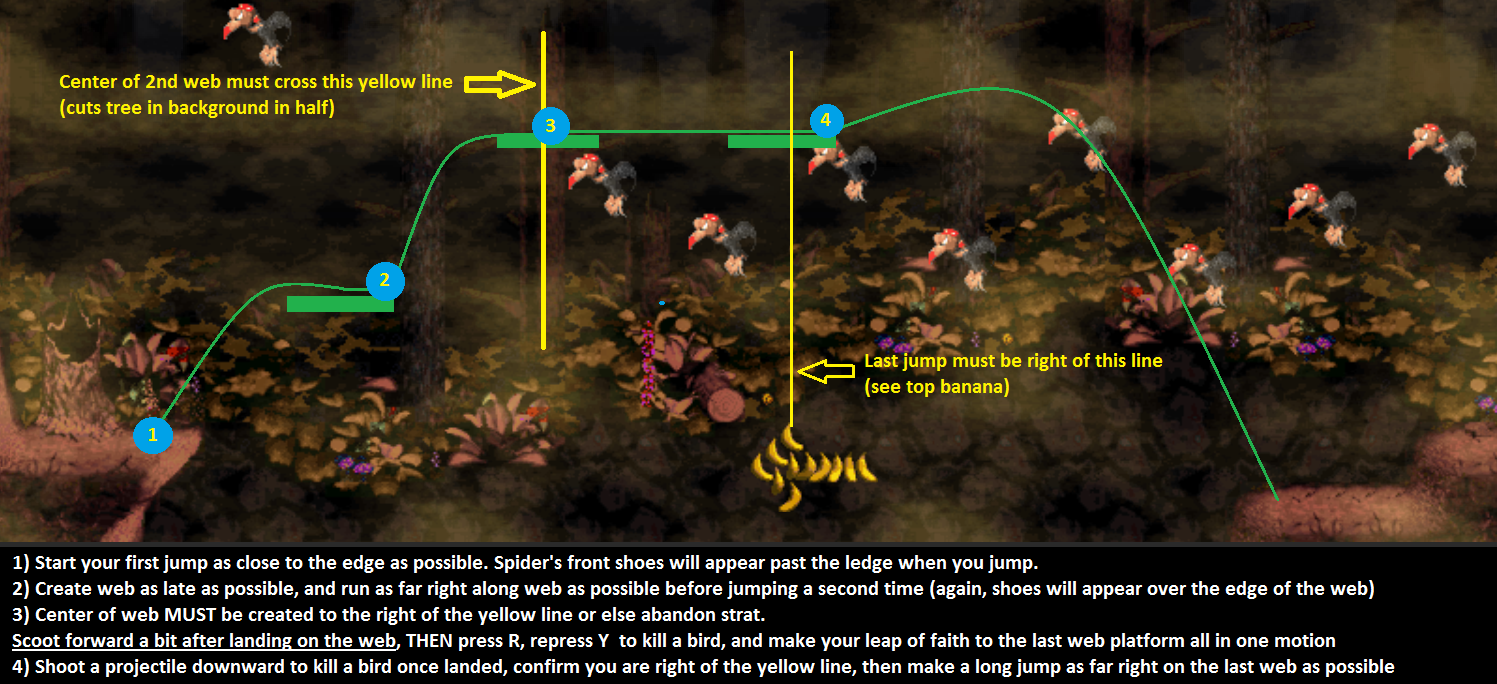
'''Eagle Jump Detailed Guide with Visual Cues''' | '''Eagle Jump Detailed Guide with Visual Cues''' | ||
| Line 47: | Line 48: | ||
</div> | </div> | ||
</div> | </div> | ||
| − | |||
[[Category:Gloomy Gulch]] | [[Category:Gloomy Gulch]] | ||
[[Category:Level]] | [[Category:Level]] | ||
Revision as of 22:39, 23 May 2019
 | |
| Game | Donkey Kong Country 2 |
|---|---|
| World name | Gloomy Gulch |
| Level name | Web Woods |
| Previous level | Parrot Chute Panic |
| Next level | Kreepy Krow |
Difficulty:
- Safe: 6/10
- Intermediate: 8/10
- Optimal: 12/10
Contents
Any%
Safe
Notes
- Do not be fooled, the safe route is still hard. It does however use a lot of extra platforms, and avoids all the damage boosts.
- Instant Platforms will need to be practiced before you can be consistent at this stage, no matter the route.
- Getting the proper feel for good platforms takes a while. The main mistake is usually making it too late, which is typically an instant death.
Intermediate
Notes
- There's a cooldown between creating instant platforms with Squitter. To optimally work around this cooldown, briefly let go of the Dpad when creating consecutive instant platforms. Note that the final 2 instant platforms of the level don't have a cooldown, so not letting go of the Dpad is viable in that instance. The final instant platform at Up in 3 after midway also has no cooldown.
- Before the Squitter section, use the bottom path and roll through the rats. The purple flower before the TNT Klobber is a good cue for where to roughly jump from.
- The two Squitter damage boosts will require practice before you can tackle this route.
- A good visual cue for this would be the damage star sprite: jump as soon as it disappears (note that cues of the sort are different from what platform you play the game on, and other input lag variables).
- At 1:13, the banana coin on the screen is a good point of reference to know how close your web is to the platform.
- Alternative safe eagle pit strat
- Another alternative that avoids repressing Y
Optimal
Additions
- At 0:05, perform the Djeez Delight. Make sure your roll is buffered and initiated fairly far away from the rat. Repress Y the moment you see Diddy in his walking animation. Note that a slow roll means that you initiated your re-roll too late (Saves ~.35).
- At 0:11, take the corners as tight as you can so that you get optimal speed rolling through the rats.
- Always repress Y before the rats on the lowest section. If you get the optimal roll nothing will be affected, but if you get the slow one, you will avoid dying by restarting a new roll.
- At 0:44, reach the platform in 2 webs after the damage boost. If you took the damage boost at the top of the bee, it's not too difficult (Saves ~.3s).
- At 0:58 is the Eagle Pit: only use 3 webs to cross the chasm. You need to be confident in your ability to know where the last web will auto-create to be optimal. Check the guide below for visual cues and tips.
- You can also manually create the last web. It is safer, but an extra input is needed.
- At 1:10 is Leap of Faith: jump before your platform is created. Once again, you can time an auto-platform or manually input the web formation.
