Difference between revisions of "Web Woods"
(Added a guide for eagle jump) |
Cryptonberry (talk | contribs) (→Optimal) |
||
| Line 32: | Line 32: | ||
{{#ev:youtube|zczKVDAGMFc|560||https://www.youtube.com/watch?v=zczKVDAGMFc}} | {{#ev:youtube|zczKVDAGMFc|560||https://www.youtube.com/watch?v=zczKVDAGMFc}} | ||
'''Additions''' | '''Additions''' | ||
| + | *jump plat shoot plat jump plat jump | ||
*At 0:09, take the corners as tight as you can so that you get optimal speed rolling through the rats. | *At 0:09, take the corners as tight as you can so that you get optimal speed rolling through the rats. | ||
**Always repress Y before the rats on the lowest section. If you get the optimal roll nothing will be affected, but if you get the slow one, you will avoid dying by restarting a new roll. | **Always repress Y before the rats on the lowest section. If you get the optimal roll nothing will be affected, but if you get the slow one, you will avoid dying by restarting a new roll. | ||
Revision as of 08:09, 28 December 2017
 | |
| Game | Donkey Kong Country 2 |
|---|---|
| World name | Gloomy Gulch |
| Level name | Web Woods |
| Previous level | Parrot Chute Panic |
| Next level | Kreepy Krow |
Difficulty:
- Baby: 6/10
- Safe: 8/10
- Optimal: 12/10
Contents
Any%
Baby
Notes
- Do not be fooled, the baby route is still hard. It does however use a lot of extra platforms, and avoids all the damage boosts.
- Instant Platforms will need to be practiced before you can be consistent at this stage, no matter the route.
- Getting the proper feel for good platforms takes a while. The main mistake is usually making it too late, which is typically an instant death.
Safe
Notes
- Before the Squitter section, use the bottom path and roll through the rats. The purple flower before the TNT Klobber is a good cue for where to roughly jump from.
- The two Squitter damage boosts will require practice before you can tackle this route.
- A good visual cue for this would be the damage star sprite: jump as soon as it disappears (note that cues of the sort are different from what platform you play the game on, and other input lag variables).
- At 1:13, the banana coin on the screen is a good point of reference to know how close your web is to the platform.
Optimal
Additions
- jump plat shoot plat jump plat jump
- At 0:09, take the corners as tight as you can so that you get optimal speed rolling through the rats.
- Always repress Y before the rats on the lowest section. If you get the optimal roll nothing will be affected, but if you get the slow one, you will avoid dying by restarting a new roll.
- At 0:40, reach the platform in 2 webs after the damage boost. If you've taken the damage boost near the eye of the top bee or further, it is not too difficult (Saves ~.3s).
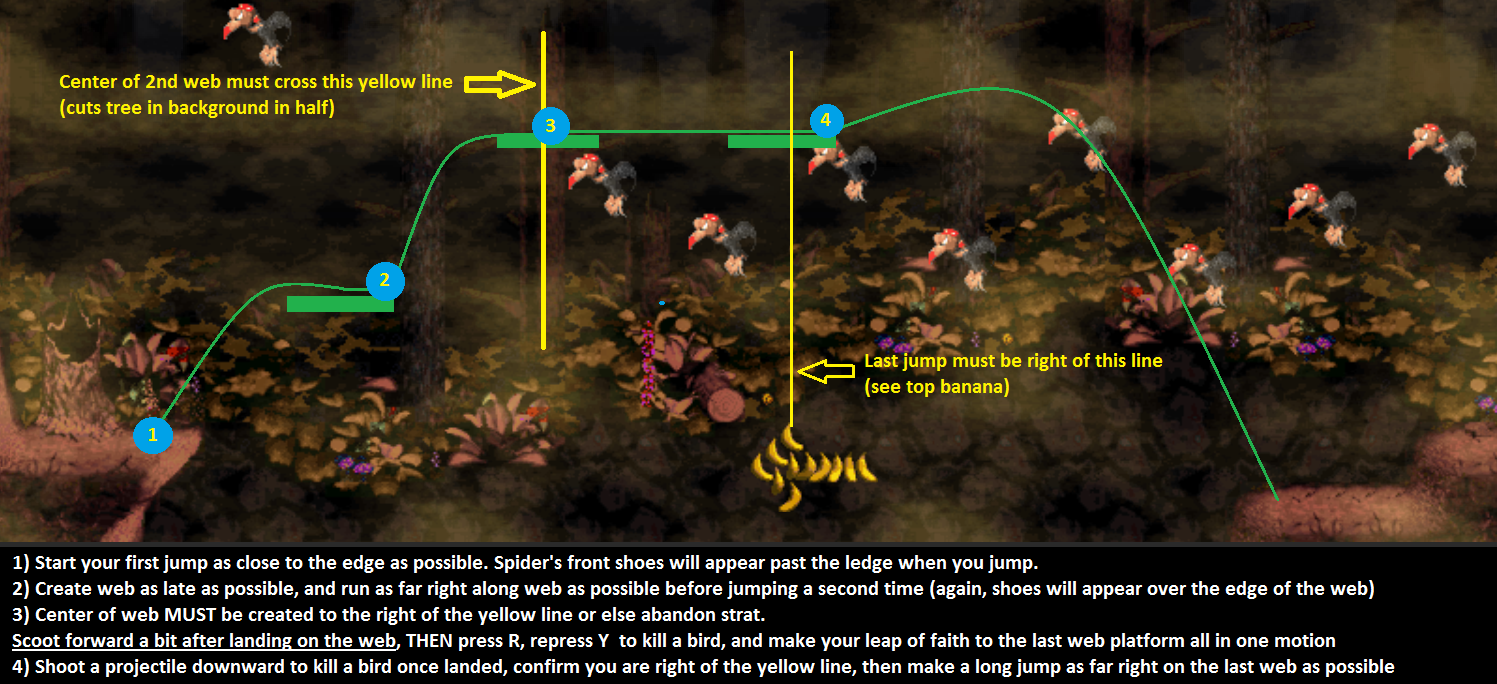
- At 0:57 is Eagle Jump: only use 3 webs to cross the chasm. You need to be confident in your ability to know where the last web will auto-create to be optimal. Check the guide below for visual cues and tips.
- You can also manually create the last web. It is safer, but an extra input is needed.
- At 1:09 is Leap of Faith: jump before your platform is created. Once again, you can time an auto-platform or manually input the web formation.
MORE STRATS
- First strat is easy if you buffer the first roll very hard. Repress Y after the DK barrel (Saves ~.3s).
- Failing to get full speed for the 2nd roll will still make you just as quick as the safe route.
- TAS Up-In-2 is a different method of doing the first damage boost section, if you struggle with the other one. It is roughly the same speed if you don't stop to take your shots.
