Difference between revisions of "Windy Well"
(→Optimal) |
(→Optimal) |
||
| Line 44: | Line 44: | ||
<div class="toccolours mw-collapsible mw-collapsed" style="width:600px"> | <div class="toccolours mw-collapsible mw-collapsed" style="width:600px"> | ||
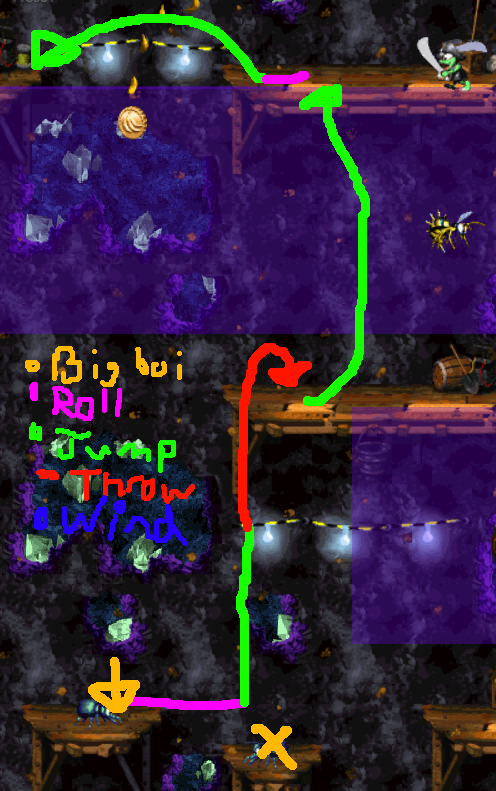
'''MS PAINT TUTORIAL''' | '''MS PAINT TUTORIAL''' | ||
| + | <div class="mw-collapsible-content"> | ||
[[File:ms_diddy_windy.png]] | [[File:ms_diddy_windy.png]] | ||
| + | *This is to give a general understanding of how the trick works. Watch the other tutorials for more details if you're having trouble | ||
| + | </div> | ||
| + | </div> | ||
<div class="toccolours mw-collapsible mw-collapsed" style="width:600px"> | <div class="toccolours mw-collapsible mw-collapsed" style="width:600px"> | ||
Revision as of 01:34, 25 January 2019
 | |
| Game | Donkey Kong Country 2 |
|---|---|
| World name | K.Rool's Keep |
| Level name | Windy Well |
| Previous level | Arctic Abyss |
| Next level | Castle Crush |
Difficulty:
- Safe: 2/10
- Intermediate: 6/10
- Optimal: 8/10
Contents
Any%
Safe
Notes
- Right at the start, roll late through the first beetle. Rolling too early can sometimes make you bounce off the 2nd beetle, leading to certain death.
- At 0:40 is the easiest skip in the level. All that is required is to jump off the hook and hold Up+Left. You can turn around a bit to be safe against the upcoming Green Kutlass, but even if you keep holding left, he should not hit you.
- At 0:55 is the biggest skip of the level. Simply land on the platform with the two bees and aim your jump so that you hit the top of the first one.
- If you did the team-up throw just before, you can get a superjump damage boost straight to the hook, as shown in the video.
- At 1:25, after the 3 bees, you need to balance how quickly you go to the left or you might fall to the platform below.
Intermediate
Additions
- At 0:15, jump off the hook and start holding right so that you slip through the hole between the ground and the bee. Mistiming this can make you hit the bee (too late) or even fall all the way down (too early).
- Immediately after, do a short hop then buffer in a glide to get over the bee and to avoid getting caught in the wind. It's a little faster to get over the bee without a glide, but more difficult.
- At 0:46, quickly hop up the platforms to avoid the hooks. Make sure to be on the far right of the platform.
- This method is still faster even if you cannot get the superjump damage boost to the hook.
- At 1:10 is Ghetto Bee Skip. While it is a bit of a tight squeeze, if you jump from about between the bananas and do the proper inputs you should be fine (Saves ~2s).
- Castle Crush is the next level, and it is imperative that you enter with both Kongs to perform the Castle Crush skip! Keep that in mind before attempting Ghetto Bees.
Optimal
Additions
- Diddy is used at the beginning instead of Dixie (Saves ~4s). See below for Diddy Windy tutorial.
- This requires swapping to Diddy at the end of Arctic.
- Perform Fast Falls throughout the stage. These are done by holding Down during the animation change at the end of a wind section. These save a handful of frames each.
- Note that some Fast Falls aren't performed in order to focus on movement immediately after (such as before Ghetto Bee Skip).
- At 0:16, the roll is buffered before Diddy reaches the platform.
- At 0:30, the damage boost has extra height due to the team throw earlier.
- At 0:42, The platform hops are even more precise while holding the barrel. Dixie will automatically drop the DK barrel after getting caught by the wind.
MS PAINT TUTORIAL
DIDDY WINDY TUTORIAL
Guidelines
- Kill the beetle with a slow roll.
- No diagonal movement with your BigBoi.
- Land far to the left on the platform. Hold Up during your throw for a length of time which depends on where you threw from to achieve this.
- Mash B to jump ASAP after you start holding Right.
- Start holding Left shortly after you've jumped.
Extra Notes
- Throwing earlier is slightly more optimal. If you see Diddy's feet, then it becomes risky. I like to be throwing the moment Diddy goes off-screen.
- If you throw early enough to where you can see Diddy's feet, you'll need to hold Up for less time than usual.
- I aim to position my throw after the hole in the wall at the top of the screen. The location of your throw doesn't matter, but it's important to be consistent since how long you should hold Up changes based on positioning.
- It can't be overstated how important it is to land as far left as possible on the platform above. Although keep in mind that you can get away with being relatively far to the right. Don't lose runs by missing the platform from holding Up for too long.
OLD DIDDY WINDY METHOD
- The method used in this tutorial loses ~.6 over the new method used in the Optimal tape.
- This method is easier to execute, but is more difficult to understand/learn.
MORE STRATS
- Make sure to do the smallest jump possible when breaking the barrel to maximize time save (Saves ~.15s).
