Barrel Shield Bust-Up Warpless
 | |
| Game | Donkey Kong Country 3 |
|---|---|
| World name | Kremwood Forest |
| Level name | Barrel Shield Bust-Up |
| Previous level | Belcha's Barn |
| Next level | Riverside Race Warpless |
No zips
Notes
- Basically the same first half as Warps up to the warp barrel, then you need to hesitate a little on the two ropes afterward (before the checkpoint).
- The rope jump at 0:59 is performed to avoid getting hit when jumping off the rope at 1:01.
Zips
Notes
- Making it in front of the monkeys at 0:20 is very precise, for easier alternatives, check the video below.
- Try to replicate the movement around 0:34 to have the rats and monkeys spawned in such a way you can safely perform a team throw without Dixie getting hit.
- Making it in front of the monkeys at 0:45 is not nearly as tight as 0:20, but requires some off screen movement.
- The rope jump at 0:53 is performed to avoid getting hit when jumping off the rope at 0:56.
ALTERNATIVES
Notes
- Doing a rope jump makes it easier to make it in front of the acorns, while being only slightly slower.
- Opting out of making it in front of the acorns is recommended if you can't do it consistently.
VISUAL CUES FOR THE FIRST ZIP
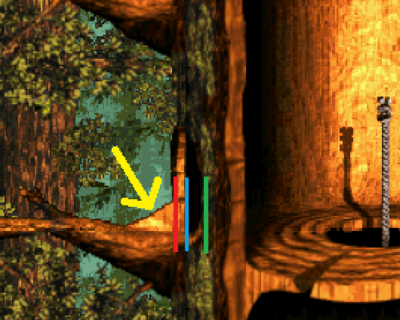
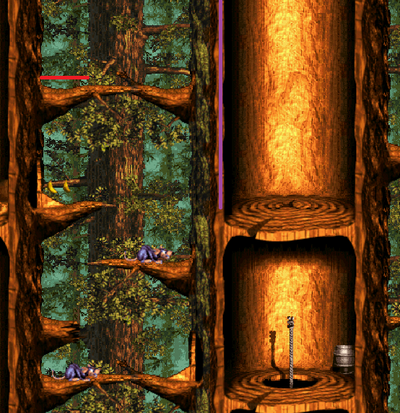
- Position Kiddy such that the left side of his feet are to the right of the red line. As seen in the video, Kiddy can be further right to the point where his feet are not visible to the left of the opening in the tree. The further right Kiddy is, the more lenient the team throw will be.
- Once the nose of the Sneek reaches the dark dot on the tree indicated by the yellow arrow, perform the team throw by pressing B, right, up and Y quickly after each other. NOTE: this visual cue only works when the left side of Kiddy's feet are between the red and blue lines. If the left side of Kiddy's feet are to the right of the blue line, you'll have to adjust your timing accordingly.
- If you get the team throw interrupted by the Sneek, roll to the left to start the zip.
- If you don't get the zip, that means you started the team throw too early.
- Once you get the zip, keep holding left until the bottom of the screen reaches the red line (you can use the dot on the tree as a visual cue).
- After the red line, keep holding right.
- Once the purple line is in the center of the screen, perform the offscreen jump onto the rope. Then by feel you can perform the rope jump to make it in front of the acorns afterwards.
VISUAL CUES FOR THE SECOND ZIP
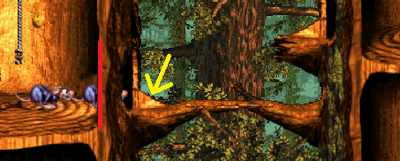
- For the second zip release the d-pad for a bit before jumping on the second Sneek or you'll kill both Sneeks.
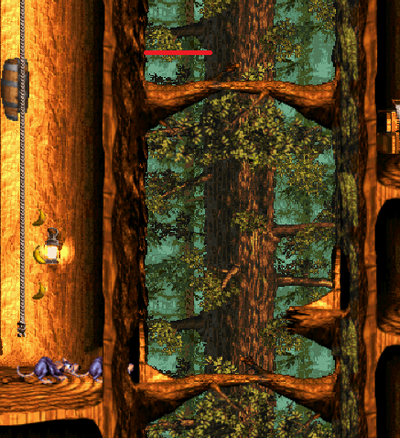
- Position Kiddy such that his eyes are barely to the left of the red line (or barely to the left of the tree opening).
- When the Sneek is on the way back and its nose touches the dot on the tree indicated by the yellow arrow, perform the jump and team throw.
- If you get the team throw interrupted by the Sneek, roll to the right to start the zip.
- If Dixie gets hit during the team throw, that means your setup wasn't correct. Do not hesitate too long before jumping on the second Sneek to avoid this from happening.
- Once you get the zip, keep holding right.
- When the bottom of the screen reaches the red line (you can use the dot on the tree as a visual cue) perform an offscreen jump onto the branch. You can then jump on the rope and make it in front of the acorns.
