Difference between revisions of "Blackout Basement"
Silent Wolf (talk | contribs) m |
|||
| (15 intermediate revisions by 5 users not shown) | |||
| Line 7: | Line 7: | ||
| next = [[Boss Dumb Drum]] | | next = [[Boss Dumb Drum]] | ||
}} | }} | ||
| − | Difficulty: | + | '''Difficulty:''' |
| + | *Optimal: 10/10 | ||
*Safe: 7/10 | *Safe: 7/10 | ||
| − | |||
| − | |||
==All Stages== | ==All Stages== | ||
| + | ===Optimal=== | ||
| + | {{#ev:youtube|5ThkTJX5wiw|560||}} | ||
| + | '''Notes:''' | ||
| + | *Nothing about this stage is random. The lights go on and off in set intervals (62 frame intervals for J, but the lights stay off a little longer on the U version). | ||
| + | *Learning to adapt to different light patterns if you screw up is hard and takes a lot of time. Try to practice finishing the stage as quickly as you can even if your pattern gets thrown off. Turning up the brightness on your TV so you can see the yellow tape and use it as visual cues may help. | ||
| + | *The roll over the gap at 0:05 requires [[DKC_Tricks#Float_Storage|Float Storage]] to be consistent but is fairly lenient. Max jump out of your first roll in the stage and continue to hold B as you roll through the first Krem. Do an extendo through the 2nd Krem while continuing to hold B to get over the gap. The repress for the extendo is right before the yellow tape on the ground. | ||
| + | *The roll over the small gap at 0:10 also requires [[DKC_Tricks#Float_Storage|Float Storage]] to clear consistently. Alternatively you can just jump off of this platform quickly and still go for the omega extendo afterwards. | ||
| + | *Omega extendo at 0:11 is very difficult and only saves up to ~40 frames. The trick involves 5 krems. For the first 2 krems, you will want to hold Y and roll through the first krem, then release Y, roll through the second krem, then repress Y shortly after. The difficult part comes with the next 3 krems. You will want to hold Y and roll through the first krem again (first of the 2nd batch), then release Y right after, and repress Y right after rolling through the 2nd krem. After that you will want to release Y again before rolling through the 3rd krem, then repress Y again right before the ledge (rrefer to input display in video). | ||
| + | *If you get the full roll, but can't roll at the end, it means you timed the double extendo (between the last three) too late. If you stop rolling immediately, you were too early. | ||
| + | *The extended roll at 0:17 is quite precise. Grabbing the rope is recommended until you are very comfortable with the trick. See the visual in the section below. | ||
| + | |||
===Safe=== | ===Safe=== | ||
{{#ev:youtube|Nj89hiBVEp4|560||}} | {{#ev:youtube|Nj89hiBVEp4|560||}} | ||
| − | Notes: | + | '''Notes:''' |
*This route completely ignores all extended rolls and tire rolls. | *This route completely ignores all extended rolls and tire rolls. | ||
*The ropes you grab are not on a global timer, they will always be there. | *The ropes you grab are not on a global timer, they will always be there. | ||
| − | *At :32 roll as soon as you land | + | *At :32, roll as soon as you land. Rolling off the edge will cause you to miss the platform and die. |
| − | *At :46 it is possible to roll | + | *At :46, it is possible to roll through 3 Kremlings instead of 2. This is faster and doesn't require an extendo, but you will have to time your jump more precisely to not die to the Klap Trap at the end. |
| − | === | + | ===Newbie Route=== |
| − | {{#ev:youtube| | + | {{#ev:youtube|iwqBaKy3pIo|560||}} |
| − | Notes: | + | '''Notes:''' |
| − | * | + | *Similar to the safe route but avoids trying to land on stuff in the dark as much as possible. Try to match the safe video instead as soon as you get a little more familiar with the stage. |
| − | |||
| − | |||
| − | |||
| − | |||
| − | |||
| − | == | + | ===First Rope Skip Visual=== |
| − | + | [[File:Bob_extendo.png]] | |
| − | |||
| − | |||
| − | |||
| − | |||
| − | |||
Latest revision as of 20:58, 29 September 2023
 | |
| Game | Donkey Kong Country |
|---|---|
| World name | Kremkroc Industries |
| Level name | Blackout Basement |
| Previous level | Mine Cart Madness |
| Next level | Boss Dumb Drum |
Difficulty:
- Optimal: 10/10
- Safe: 7/10
All Stages
Optimal
Notes:
- Nothing about this stage is random. The lights go on and off in set intervals (62 frame intervals for J, but the lights stay off a little longer on the U version).
- Learning to adapt to different light patterns if you screw up is hard and takes a lot of time. Try to practice finishing the stage as quickly as you can even if your pattern gets thrown off. Turning up the brightness on your TV so you can see the yellow tape and use it as visual cues may help.
- The roll over the gap at 0:05 requires Float Storage to be consistent but is fairly lenient. Max jump out of your first roll in the stage and continue to hold B as you roll through the first Krem. Do an extendo through the 2nd Krem while continuing to hold B to get over the gap. The repress for the extendo is right before the yellow tape on the ground.
- The roll over the small gap at 0:10 also requires Float Storage to clear consistently. Alternatively you can just jump off of this platform quickly and still go for the omega extendo afterwards.
- Omega extendo at 0:11 is very difficult and only saves up to ~40 frames. The trick involves 5 krems. For the first 2 krems, you will want to hold Y and roll through the first krem, then release Y, roll through the second krem, then repress Y shortly after. The difficult part comes with the next 3 krems. You will want to hold Y and roll through the first krem again (first of the 2nd batch), then release Y right after, and repress Y right after rolling through the 2nd krem. After that you will want to release Y again before rolling through the 3rd krem, then repress Y again right before the ledge (rrefer to input display in video).
- If you get the full roll, but can't roll at the end, it means you timed the double extendo (between the last three) too late. If you stop rolling immediately, you were too early.
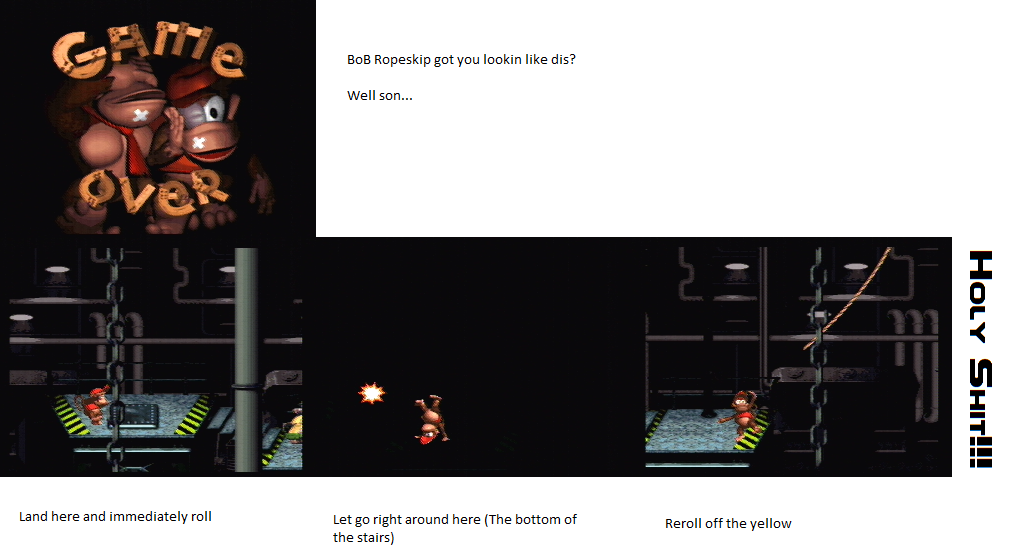
- The extended roll at 0:17 is quite precise. Grabbing the rope is recommended until you are very comfortable with the trick. See the visual in the section below.
Safe
Notes:
- This route completely ignores all extended rolls and tire rolls.
- The ropes you grab are not on a global timer, they will always be there.
- At :32, roll as soon as you land. Rolling off the edge will cause you to miss the platform and die.
- At :46, it is possible to roll through 3 Kremlings instead of 2. This is faster and doesn't require an extendo, but you will have to time your jump more precisely to not die to the Klap Trap at the end.
Newbie Route
Notes:
- Similar to the safe route but avoids trying to land on stuff in the dark as much as possible. Try to match the safe video instead as soon as you get a little more familiar with the stage.
