Difference between revisions of "Clam City"
(Created page with "{{Infobox level | image = LockjawsLocker.jpg | game = Donkey Kong Country | world_name = Vine Valley | level_name = Clam City | previous = Orang-utan Gang | next = [[B...") |
Silent Wolf (talk | contribs) m |
||
| (21 intermediate revisions by 10 users not shown) | |||
| Line 1: | Line 1: | ||
{{Infobox level | {{Infobox level | ||
| − | | image = | + | | image = Clam City.png |
| game = Donkey Kong Country | | game = Donkey Kong Country | ||
| world_name = [[Vine Valley]] | | world_name = [[Vine Valley]] | ||
| level_name = Clam City | | level_name = Clam City | ||
| previous = [[Orang-utan Gang]] | | previous = [[Orang-utan Gang]] | ||
| − | | next = [[Bumble B | + | | next = [[Bumble B Rumble]] |
}} | }} | ||
| − | Difficulty: | + | '''Difficulty:''' |
| − | |||
*Optimal: 5/10 | *Optimal: 5/10 | ||
| − | |||
| − | |||
| − | |||
| − | |||
| − | |||
| − | |||
| − | |||
| − | |||
| − | |||
| + | ==All Stages== | ||
| + | ===Optimal=== | ||
| + | {{#ev:youtube|3Kk3K__vkqI|560||https://www.youtube.com/watch?v=3Kk3K__vkqI}} | ||
| + | '''Notes:''' | ||
| + | *Holding Y does not make you swim faster. | ||
| + | *Both kongs swim at the same speed and ride Enguarde at the same speed. | ||
| + | *Counting and being consistent with the angles of your lunges is crucial to becoming consistent at this stage. If not, it can be very easy to lose your fish. | ||
| + | *If you try and lunge too soon with Enguarde after lunging previously, nothing will come out (dropped lunge). To prevent this, plinking both the B and Y buttons for each lunge gives you a better chance of not dropping your lunges and getting the optimal timing. Optimal lunges go a long way in this stage. | ||
| + | *Before you mount Enguarde, be sure to stop your moment to the left. Otherwise you will move left slightly after mounting him. | ||
| + | *If you are going for the dismount strat at the end of the stage there are 2 ways of doing it. One is to cut the corner leading up to the final section and do every lunge optimally and the other is to simply do every lunge sub optimally - either will set you up nicely for the dismount at the end. Doing every lunge optimally but dropping a lunge will be the equivalent of doing every lunge sub optimally, so it will still work out. Where this strat becomes difficult is the in between - if all of your lunges are just slightly sub optimal, you won't be positioned correctly for the ending and will likely bonk. It just takes practice. | ||
| + | *Alternatively, you can set up a lunge through the Clambo at the end. However, this strat is arguably more difficult and slightly slower. Visuals for this can be found below. | ||
| + | *Lunging through the final section and simply lunging above the final Clambo is recommended if all else fails. | ||
| − | |||
| − | |||
| − | |||
| − | == | + | ===Corners Visual=== |
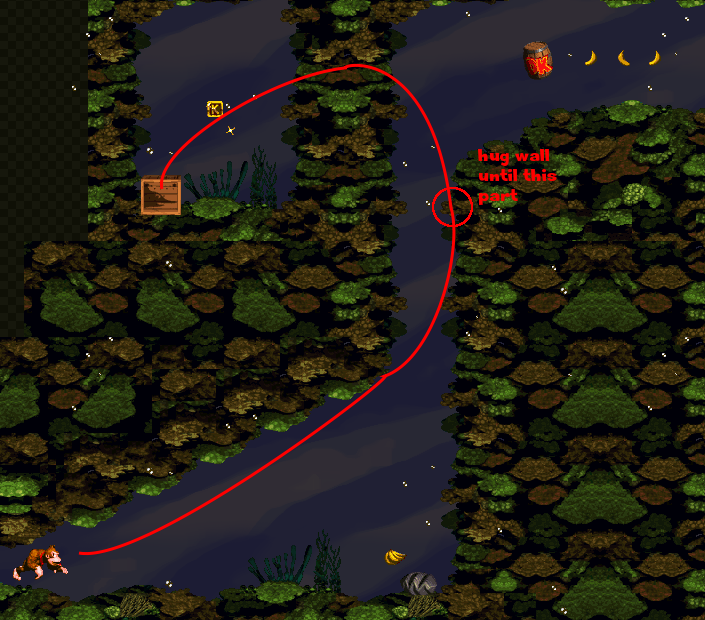
| + | [[File:clam1.png]] | ||
| − | + | ===Croc Route Visual=== | |
| + | [[File:clam2.png]] | ||
| + | |||
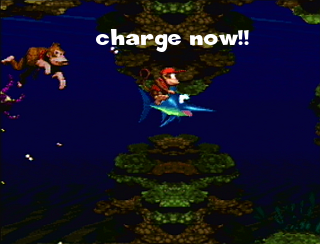
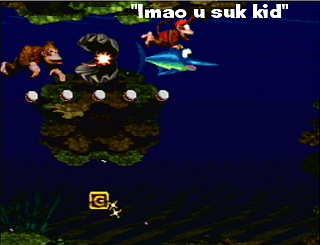
| + | ===Clam Clip Visual=== | ||
| + | [[File:clam3.png]] [[File:clam4.png]] | ||
Latest revision as of 20:51, 29 September 2023
 | |
| Game | Donkey Kong Country |
|---|---|
| World name | Vine Valley |
| Level name | Clam City |
| Previous level | Orang-utan Gang |
| Next level | Bumble B Rumble |
Difficulty:
- Optimal: 5/10
All Stages
Optimal
Notes:
- Holding Y does not make you swim faster.
- Both kongs swim at the same speed and ride Enguarde at the same speed.
- Counting and being consistent with the angles of your lunges is crucial to becoming consistent at this stage. If not, it can be very easy to lose your fish.
- If you try and lunge too soon with Enguarde after lunging previously, nothing will come out (dropped lunge). To prevent this, plinking both the B and Y buttons for each lunge gives you a better chance of not dropping your lunges and getting the optimal timing. Optimal lunges go a long way in this stage.
- Before you mount Enguarde, be sure to stop your moment to the left. Otherwise you will move left slightly after mounting him.
- If you are going for the dismount strat at the end of the stage there are 2 ways of doing it. One is to cut the corner leading up to the final section and do every lunge optimally and the other is to simply do every lunge sub optimally - either will set you up nicely for the dismount at the end. Doing every lunge optimally but dropping a lunge will be the equivalent of doing every lunge sub optimally, so it will still work out. Where this strat becomes difficult is the in between - if all of your lunges are just slightly sub optimal, you won't be positioned correctly for the ending and will likely bonk. It just takes practice.
- Alternatively, you can set up a lunge through the Clambo at the end. However, this strat is arguably more difficult and slightly slower. Visuals for this can be found below.
- Lunging through the final section and simply lunging above the final Clambo is recommended if all else fails.


