Difference between revisions of "Glimmer's Galleon"
Cryptonberry (talk | contribs) m |
|||
| (16 intermediate revisions by 6 users not shown) | |||
| Line 7: | Line 7: | ||
| next = [[Krockhead Klamber]] | | next = [[Krockhead Klamber]] | ||
}} | }} | ||
| − | Difficulty: | + | Difficulty |
| + | *Safe: 10/10 | ||
| + | *Optimal: 10/10 | ||
==Any%== | ==Any%== | ||
| − | === | + | ===Safe=== |
| − | {{#ev:youtube| | + | {{#ev:youtube|yVYUx9Qo5xU|560||https://www.youtube.com/watch?v=yVYUx9Qo5xU}} |
'''Notes''' | '''Notes''' | ||
| − | *This level is deceptively hard. Not touching any walls/corners is difficult to achieve. | + | *We swap to Diddy at 0:33 since Diddy's hitbox is smaller. This makes the end of this level easier. |
| − | * | + | *This level is deceptively hard. Not touching any walls/corners is difficult to achieve, and requires a ton of practice. |
| − | + | *You can manipulate the puffer explosion in the final room and not have to wait for his spine to go by while going up the final tunnel. To do so, hug the corners seen below when entering the area and move quickly past the puffers: | |
| − | |||
| − | |||
| − | |||
| − | |||
<div class="toccolours mw-collapsible mw-collapsed" style="width:600px"> | <div class="toccolours mw-collapsible mw-collapsed" style="width:600px"> | ||
| − | ''' | + | '''Puffer Manip''' |
| − | <div class="mw-collapsible-content"> | + | <div class="mw-collapsible-content"> |
| − | + | [[File:GlimmersCorner.png]]<br> | |
| − | |||
| − | |||
</div> | </div> | ||
</div> | </div> | ||
| + | *Alternatively, if you did not despawn him but are still going fast enough, you can go up the tunnel before the spine hits you. | ||
| + | *On Virtual Console, Glimmer does not blind the screen when moving the light left to right like he does on SNES. | ||
| + | **This may seem like a good thing for VC, but us SNES players firmly believe that each white flash makes us stronger speedrunners, making up for the billion frames lost due to poor load times. | ||
| + | ===Optimal=== | ||
| + | {{#ev:youtube|Ll8IC7Rtq0I|560||https://www.youtube.com/watch?v=Ll8IC7Rtq0I}} | ||
| + | '''Additions''' | ||
| + | *Wait for the third DK barrel in the stage to grab Diddy to reduce lag at the section after halfway. | ||
| + | *Perform the Kipples swap at the end of stage, in order to have Diddy in front for [[Krockhead Klamber]]. | ||
| + | *You never want to be Diddy in this level he is bad please see diagram for proof. | ||
| + | **Since Dixie's hitbox is slightly bigger than Diddy, navigating the level can be a bit harder. | ||
| + | [[File:NeverDiddy.jpg]] | ||
| − | + | '''References''' | |
| − | == | + | *Drum's 41:58 might be old, but still has [https://www.youtube.com/watch?v=d2l8OCm9HQU&t=7m5s one of the best Glimmer's Galleon ever done]. |
| − | + | *[https://www.youtube.com/watch?v=GA0MOf6nt70 V0oid's 78.81] | |
[[Category:Krem Quay]] | [[Category:Krem Quay]] | ||
[[Category:Level]] | [[Category:Level]] | ||
Latest revision as of 00:31, 4 October 2020
 | |
| Game | Donkey Kong Country 2 |
|---|---|
| World name | Krem Quay |
| Level name | Glimmer's Galleon |
| Previous level | Barrel Bayou |
| Next level | Krockhead Klamber |
Difficulty
- Safe: 10/10
- Optimal: 10/10
Any%
Safe
Notes
- We swap to Diddy at 0:33 since Diddy's hitbox is smaller. This makes the end of this level easier.
- This level is deceptively hard. Not touching any walls/corners is difficult to achieve, and requires a ton of practice.
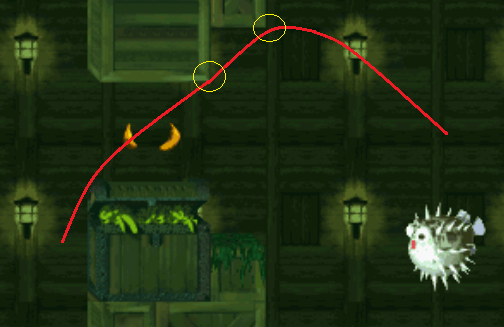
- You can manipulate the puffer explosion in the final room and not have to wait for his spine to go by while going up the final tunnel. To do so, hug the corners seen below when entering the area and move quickly past the puffers:
- Alternatively, if you did not despawn him but are still going fast enough, you can go up the tunnel before the spine hits you.
- On Virtual Console, Glimmer does not blind the screen when moving the light left to right like he does on SNES.
- This may seem like a good thing for VC, but us SNES players firmly believe that each white flash makes us stronger speedrunners, making up for the billion frames lost due to poor load times.
Optimal
Additions
- Wait for the third DK barrel in the stage to grab Diddy to reduce lag at the section after halfway.
- Perform the Kipples swap at the end of stage, in order to have Diddy in front for Krockhead Klamber.
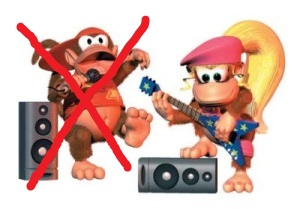
- You never want to be Diddy in this level he is bad please see diagram for proof.
- Since Dixie's hitbox is slightly bigger than Diddy, navigating the level can be a bit harder.
References
- Drum's 41:58 might be old, but still has one of the best Glimmer's Galleon ever done.
- V0oid's 78.81

