Difference between revisions of "Oil Drum Alley"
Silent Wolf (talk | contribs) |
Silent Wolf (talk | contribs) m |
||
| (20 intermediate revisions by 3 users not shown) | |||
| Line 7: | Line 7: | ||
| next = [[Trick Track Trek]] | | next = [[Trick Track Trek]] | ||
}} | }} | ||
| − | Difficulty: | + | '''Difficulty:''' |
| + | *Optimal (SJR): 5/10 | ||
| + | *Optimal (No SJR/No Major Skips): 10/10 | ||
*Safe: 6/10 | *Safe: 6/10 | ||
| − | |||
| − | |||
| − | |||
==All Stages== | ==All Stages== | ||
| − | |||
| − | |||
| − | |||
| − | |||
| − | |||
| − | |||
| − | |||
| − | |||
===Optimal (SJR)=== | ===Optimal (SJR)=== | ||
| − | {{#ev:youtube| | + | {{#ev:youtube|jHs3TxEPcR0||}} |
| − | Notes: | + | '''Notes:''' |
| − | * | + | *This [[DKC_Tricks#Super_Jumproll_.28SJR.29|SJR]] saves 14-17s depending on whether you do the dboost at the end of the world 4 boss and how well you do the stage without the [[DKC_Tricks#Super_Jumproll_.28SJR.29|SJR]]. |
| − | * | + | *To set up the [[DKC_Tricks#Super_Jump|Super Jump]], jump over the first oil drum and run into it from the right side. |
| + | *After breaking open the DK barrel, jump and land somewhere near the center of the fire. It honestly doesn't matter where you land on the fire, the important part is making sure you land in the same spot every time for your particular setup. | ||
| + | *The goal for this setup is to give the Krem enough time to be positioned along the top edge of the oil drum as you run off of it. If the Krem is too low when you run off and initiate the [[DKC_Tricks#Jumproll|Jumproll]] portion of the [[DKC_Tricks#Super_Jumproll_.28SJR.29|SJR]], you will only get a single explosion 9busrt animation you see when hitting an enemy), which will give you a [[DKC_Tricks#Jumproll|Jumproll]] instead of an [[DKC_Tricks#Super_Jumproll_.28SJR.29|SJR]]. so if this happens to you, it means your setup was too fast. | ||
| + | *If you take damage in the center of the fire, you will want to run just past the black pole before moving back to the right to go for the frame. | ||
| + | *This trick is sometimes more than a 1 frame window, and sometimes not. If it's more than 1 frame, I believe it would be just 2 frames still though (needs more testing). | ||
| + | *After you hit the trick, do a quick left -> right wiggle once you're aligned with the group of pipes in the background to make sure you hit the Gnawty afterwards and don't bonk instead. Keep Y released as you roll through the first Gnawty, but then quickly do another wiggle an repress Y as you roll through the final Gnawty. | ||
| − | The cue to release B will be different depending on whether you hit the Gnawty | + | The cue for when to release B will be different depending on whether you hit the Gnawty (see visual below) |
| − | |||
| − | |||
| − | |||
| − | |||
| − | |||
| − | |||
| − | |||
| − | |||
| − | + | [[File:ODA B Release.png|720px]] | |
| − | |||
| − | |||
| − | |||
| − | |||
| − | |||
| − | |||
<div class="toccolours mw-collapsible mw-collapsed" style="width:600px"> | <div class="toccolours mw-collapsible mw-collapsed" style="width:600px"> | ||
| − | ''' | + | '''Damageless SJR Notes (Obsolete)''' |
<div class="mw-collapsible-content"> | <div class="mw-collapsible-content"> | ||
| − | {{#ev:youtube| | + | ===Damageless SJR Tutorial=== |
| − | + | {{#ev:youtube|EZU8Nm3MBpE||}} | |
| − | + | ||
| − | + | ===Damageless SJR Variations and Backups=== | |
| − | + | {{#ev:youtube|2eyZBn46ycg||}} | |
| − | |||
'''Damageless Kanis SJR Setup''' | '''Damageless Kanis SJR Setup''' | ||
| − | |||
{{#ev:youtube|q3t-J_xraeo|560||https://www.youtube.com/watch?v=q3t-J_xraeo}} | {{#ev:youtube|q3t-J_xraeo|560||https://www.youtube.com/watch?v=q3t-J_xraeo}} | ||
| Line 66: | Line 46: | ||
</div> | </div> | ||
| − | == | + | ===Optimal (No SJR)=== |
| − | === | + | {{#ev:youtube|_MBqpM-2UDA|560||}} |
| − | {{#ev:youtube| | + | '''Notes:''' |
| − | Notes: | + | *Arguably one of the hardest stages in the game. |
| − | *The | + | *The roll through the Gnawty at 0:14 requires an extendo to make it over the subsequent gap. You'll have to time the jump into the blast barrel afterwards though, as you can't roll all the way over the ledge. |
| − | * | + | *See the visual in the section below for the extendo at 0:28. |
| − | + | *See the visual below for the final extendo through the Mankey towards the end. | |
| − | + | ||
| − | * | + | ===Safe=== |
| − | * | + | {{#ev:youtube|_EuBapA8jN8|560||}} |
| + | '''Notes:''' | ||
| + | *This route skips some hard jumps and makes the oil drum section at the end much easier without sacrificing nearly as much time as waiting for the full cycle does. | ||
| + | *The oil drums on this stage only hurt you when the flame is fully out. When it's still moving in or out, it is safe to land on. As in Torchlight Trouble, they also don't hurt Diddy at any point if he lands on the edge. | ||
| + | *The double Gnawty roll at :13 is not an extendo; just follow the movements and hold down Y the whole time. A well-timed jump will get you into the barrel instantly. | ||
| + | *At :40, do a big bounce off the Kremling, and you'll land late enough on the oil drum to avoid getting hit. | ||
| + | |||
| + | ===Visuals for Playing Through the Stage=== | ||
| + | '''Note:''' The below visuals are all slightly suboptimal, but they still serve as good references for how to do these sections in general. | ||
| + | |||
| + | ====Barrel Roll Visual==== | ||
| + | [[File:Barrel jump oda.png]] | ||
| + | |||
| + | ====First Mankey Visual==== | ||
| + | [[File:5-1.jpg|650px]] | ||
| + | |||
| + | ====Extendo Under Barrel Visual==== | ||
| + | [[File:Oda_extendo.png|950px]] | ||
| + | *You can actually do the final Y repress immediately after rolling through the barrel behind the Mankey, but doing so will make jumping onto the next ledge more difficult to do without bonking. | ||
| + | |||
| + | ====Last Extendo Visual==== | ||
| + | [[File:Oda_last.png|950px]] | ||
| + | *Ignore the "Tap right" part towards the end of this visual - there's no need to release and re-tap right on the dpad unless you feel as though you overshot the jump leading up to that oil drum. It's better to have a visual cue for when to do a min height jump such that you don't need to release dpad. | ||
Latest revision as of 20:55, 29 September 2023
 | |
| Game | Donkey Kong Country |
|---|---|
| World name | Kremkroc Industries |
| Level name | Oil Drum Alley |
| Previous level | Really Gnawty Rampage |
| Next level | Trick Track Trek |
Difficulty:
- Optimal (SJR): 5/10
- Optimal (No SJR/No Major Skips): 10/10
- Safe: 6/10
Contents
All Stages
Optimal (SJR)
Notes:
- This SJR saves 14-17s depending on whether you do the dboost at the end of the world 4 boss and how well you do the stage without the SJR.
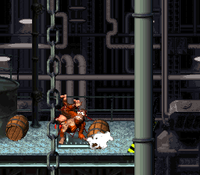
- To set up the Super Jump, jump over the first oil drum and run into it from the right side.
- After breaking open the DK barrel, jump and land somewhere near the center of the fire. It honestly doesn't matter where you land on the fire, the important part is making sure you land in the same spot every time for your particular setup.
- The goal for this setup is to give the Krem enough time to be positioned along the top edge of the oil drum as you run off of it. If the Krem is too low when you run off and initiate the Jumproll portion of the SJR, you will only get a single explosion 9busrt animation you see when hitting an enemy), which will give you a Jumproll instead of an SJR. so if this happens to you, it means your setup was too fast.
- If you take damage in the center of the fire, you will want to run just past the black pole before moving back to the right to go for the frame.
- This trick is sometimes more than a 1 frame window, and sometimes not. If it's more than 1 frame, I believe it would be just 2 frames still though (needs more testing).
- After you hit the trick, do a quick left -> right wiggle once you're aligned with the group of pipes in the background to make sure you hit the Gnawty afterwards and don't bonk instead. Keep Y released as you roll through the first Gnawty, but then quickly do another wiggle an repress Y as you roll through the final Gnawty.
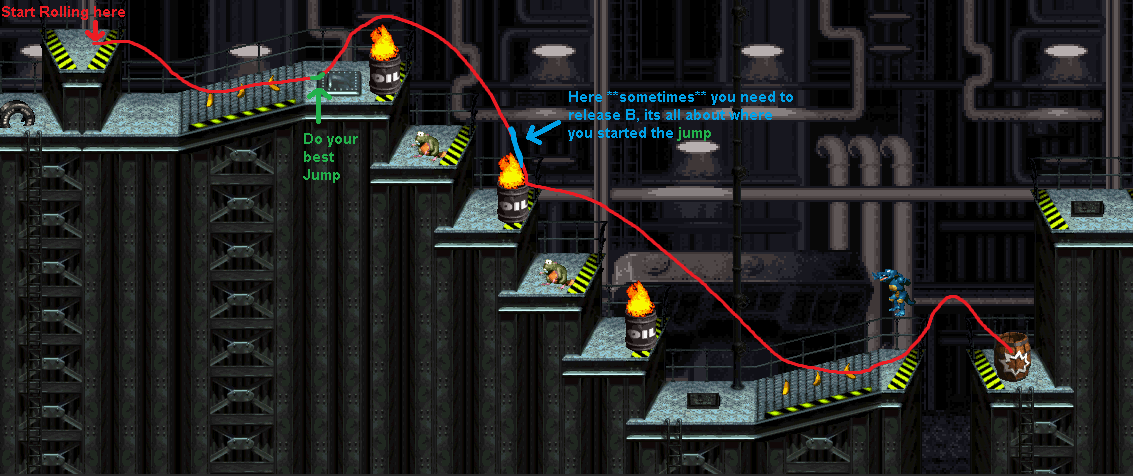
The cue for when to release B will be different depending on whether you hit the Gnawty (see visual below)
Damageless SJR Notes (Obsolete)
Damageless SJR Tutorial
Damageless SJR Variations and Backups
Damageless Kanis SJR Setup
Notes:
- You want to do an SJR setup where you don't take damage if you intend to go for the Antics SJR.
Optimal (No SJR)
Notes:
- Arguably one of the hardest stages in the game.
- The roll through the Gnawty at 0:14 requires an extendo to make it over the subsequent gap. You'll have to time the jump into the blast barrel afterwards though, as you can't roll all the way over the ledge.
- See the visual in the section below for the extendo at 0:28.
- See the visual below for the final extendo through the Mankey towards the end.
Safe
Notes:
- This route skips some hard jumps and makes the oil drum section at the end much easier without sacrificing nearly as much time as waiting for the full cycle does.
- The oil drums on this stage only hurt you when the flame is fully out. When it's still moving in or out, it is safe to land on. As in Torchlight Trouble, they also don't hurt Diddy at any point if he lands on the edge.
- The double Gnawty roll at :13 is not an extendo; just follow the movements and hold down Y the whole time. A well-timed jump will get you into the barrel instantly.
- At :40, do a big bounce off the Kremling, and you'll land late enough on the oil drum to avoid getting hit.
Visuals for Playing Through the Stage
Note: The below visuals are all slightly suboptimal, but they still serve as good references for how to do these sections in general.
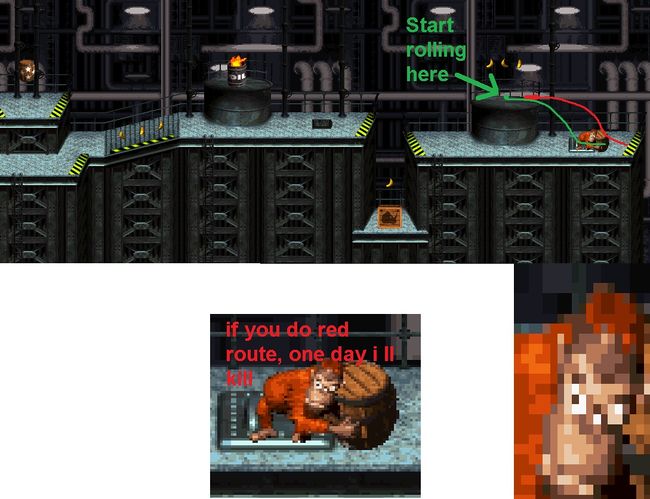
Barrel Roll Visual
First Mankey Visual
Extendo Under Barrel Visual
- You can actually do the final Y repress immediately after rolling through the barrel behind the Mankey, but doing so will make jumping onto the next ledge more difficult to do without bonking.
Last Extendo Visual
- Ignore the "Tap right" part towards the end of this visual - there's no need to release and re-tap right on the dpad unless you feel as though you overshot the jump leading up to that oil drum. It's better to have a visual cue for when to do a min height jump such that you don't need to release dpad.


