Ripcurl Reef
| Game | Donkey Kong Country 3 (GBA) |
|---|---|
| World name | Pacifica |
| Level name | Ripcurl Reef |
| Previous level | Cliffside Blast |
| Next level | Surf's Up |
Contents
Any%
There are two different ways to get the out of bounds and in bounds clip in this stage. Both methods are seemingly inconsistent. Variation 2 is faster when done optimally, but due to the random nature, both variations average out to around the same time. All clips written down below work with either Kong in the lead.
Optimal - out of bounds clip variation 1
Notes
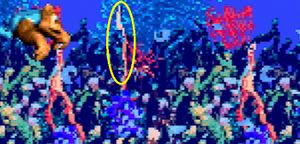
- To perform the out of bounds clip, swim left towards the pink piece of coral circled in the picture below. When you reach this piece of coral, press right and swap while the Kongs are in the process of turning around.
- This clip has a 50% success rate and can be retried until you get it.
- The second Kong will not automatically join the leading Kong when they're out of bounds. To make sure the second Kong joins you, you'll want to swim down far enough. In the video, down is held until a small fish swims off screen at 0:13. Afterwards, swim up until the Kongs are just below the stage.
- When swimming upwards along the right wall, make sure to not hug the wall too early. There are some invisible horizontal walls that will stop you.
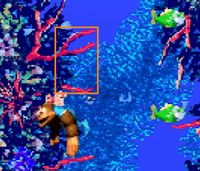
- To get the clip in bounds, swim up until the leading Kong touches the piece of coral indicated with orange in the picture below. At this point, press down and A to lose your momentum and start sinking. Once the leading Kong has sunk to the piece of coral indicated with grey in the picture below, swap.
- This clip in bounds is consistent if performed well.
- Try to not go too far left. You fade into the room with the goalpost faster if you touch the level exit from the right side.
Optimal - out of bounds clip variation 2
Notes
- To perform the out of bounds clip, swim up along the left wall and swap when the leading Kong is in the area indicated in the image below.
- This clip will not always work. A backup is shown in the alternative clips video.
- You will end up on top of the stage after the clip. There are two vertical walls that you need to jump over. The first is right after you land on top of the stage. The second jump is at 0:30 in the video, just before the green Lurchin in the bottom right corner of the screen becomes visible.
- If Kiddy is in front after the out of bounds clip, it is faster to roll on top of the stage between jumps.
- To get the clip in bounds, land in the water to the right of the stage exit and swim up until an invisible ceiling stops the kongs. Then tap down and A to perform a small swim, and once the Kongs have sunk to be level with the stage exit, swap.
- This clip has a relatively high success rate, but will not always work. It can easily be retried if it fails.
- An alternative clip in bounds is shown in the alternative clips video.
Alternative clips for out of bounds clip variation 2
Notes
- If the initial out of bounds clip does not work, you can swim up to the point in the video. Once in the top left corner, tap down and A to perform a small swim, and once the Kongs have sunk a bit, swap.
- This clip has a relatively high success rate, but will not always work. It can easily be retried if it fails. You do not need to go back to the ceiling before attempting it again. You can swap in place if the first one fails.
- For the in bounds clip, if you manage to land on top of the invisible ceiling you can clip in bounds from there. To do this, tap down and A to perform a small swim, and swap right afterwards (while the Kongs are moving up).
- This clip has a lower success rate than the clip below the invisible ceiling, but can be faster.
- Try to enter the level exit from the top pixel. This will fade you into the room with the goal post faster.


