Difference between revisions of "Tanked Up Trouble"
(→Kremtut Bee Wiggle Visual) |
Silent Wolf (talk | contribs) m (→Fast BirdTuT) |
||
| (16 intermediate revisions by 3 users not shown) | |||
| Line 7: | Line 7: | ||
| next = [[Manic Mincers]] | | next = [[Manic Mincers]] | ||
}} | }} | ||
| − | Difficulty: | + | '''Difficulty:''' |
| − | * | + | *BirdTuT: 6/10 |
| − | * | + | *KremTuT: 10/10 |
| − | * | + | *BeavTuT: 6.5/10 |
| + | *No Jumproll: 1/10 | ||
==All Stages== | ==All Stages== | ||
| − | |||
| − | |||
| − | |||
| − | |||
| − | |||
| − | |||
| − | |||
| − | |||
| − | |||
| − | |||
| − | |||
| − | |||
| − | |||
| − | |||
| − | |||
| − | |||
| − | |||
| − | |||
| − | |||
| − | |||
| − | === | + | ===Optimal - BirdTuT Jumproll=== |
| + | {{#ev:youtube|hmOmIbPXUFA|560||}} | ||
| + | '''Notes:''' | ||
| + | *Hitting a [[DKC_Tricks#Jumproll|Jumproll]] in this stage is the most important trick in the entire run, as it saves over 40 seconds. | ||
| + | *This is 10 - 12.5 seconds slower than the KremTuT [[DKC_Tricks#Jumproll|Jumproll]] described below, but is significantly less risky to go for in a run. | ||
| + | *The trick is to spawn the Necky at the right time, so he ends up at the correct height for you to be able to run off of the cart and get a [[DKC_Tricks#Jumproll|Jumproll]] off of. | ||
| + | *To set this up, stand in the center of the cart and once the cart begins moving right after moving down, roll over to the floating platform and grab the fuel can. | ||
| + | *Position yourself on the left ledge of the platform. Once the right edge of the cart touches the vertical grey line supporting the cart's track, tap left to leave the platform, then begin running to the right immediately after landing. | ||
| + | *Make sure to tap Y for the [[DKC_Tricks#Jumproll|Jumproll]] rather than hold, as holding can cause this one to fail if you get a double explosion. | ||
| + | *watch the tutorial below to understand how to best follow up the trick from this point onwards, as it can end up saving you a couple seconds and prevent you from losing your run. | ||
| + | |||
| + | ===Fast BirdTuT=== | ||
| + | {{#ev:youtube|_ICmvEDLp04|560||}} | ||
| + | '''Notes:''' | ||
| + | *Once you have settled on a setup for BirdTuT, it is recommended to use this strategy to potentially save time and also minimize the risk of hitting the bees towards the end. | ||
| + | |||
| + | ===Alternative BirdTuT Setup=== | ||
{{#ev:youtube|MbmfYqqr-m8|560||}} | {{#ev:youtube|MbmfYqqr-m8|560||}} | ||
| − | Notes: | + | '''Notes:''' |
*An alternate setup from 2012 that you may find to be more consistent. | *An alternate setup from 2012 that you may find to be more consistent. | ||
| − | * | + | *To do this setup, stand in the center and run when the platform starts going right. |
| − | + | *Grab the fuel can. | |
| − | + | *When you land on the platform, wait just a brief moment. If you want a cue, watch Diddy's arms and jump off once they swing all the way backwards. Alternatively, just practice to get a sense for the timing yourself. | |
| − | + | *Land directly in the center of the bird, on its back. | |
| − | + | *Keep Y held down until the [[DKC_Tricks#Jumproll|Jumproll]]. | |
| − | + | *Fall straight down. | |
| − | + | *Run right as soon as you land on the platform. You should land near the edge of the platform, but if you almost fall off, you waited too long somewhere. | |
| − | + | *Make sure to tap Y for the frame rather than hold, as holding can cause this one to fail. | |
| − | + | *Follow the Fast BirdTuT tutorial above to understand how to best finish out the trick. | |
| − | ** | + | |
| − | **If you | + | ===Optimal - KremTuT Jumproll=== |
| + | {{#ev:youtube|GxdyU_clNFI|560|}} | ||
| + | '''Notes:''' | ||
| + | *KremTuT saves 10 - 12.5s over BirdTuT, but is riskier due to it requiring you to wiggle between platforms, and dodge some nasty bees later on (which require a certain height for the [[DKC_Tricks#Jumproll|Jumproll]]). | ||
| + | *To do this setup, delay grabbing the fuel can 0:32 just a bit (like in the video) so that you don't get punished for the cart running out of fuel when you land from getting shot out of the barrel at the end of the stage. | ||
| + | *Afterwards, position yourself directly over the rightmost lightbulb on the cart (centered over it). | ||
| + | *Leading up to the [[DKC_Tricks#Jumproll|Jumproll]] itself, it's nice to jump to get DK to shut up so he doesn't distract you during the trick. | ||
| + | *Once the tip of the Krem's nose is centered between the 2 vertical grey supports for his floating platform, run to the left and time the Y press to get the frame. | ||
| + | *The moment after you hit the frame, immediately press right to avoid landing on the floating platform. You'll need to do an extra left -> right wiggle shortly afterwards to avoid both platforms as well. Then you can begin moving to the right. | ||
| + | *Use the visuals in the section below as a reference for your height and for the wiggle to get past the bees at 1:00. If you're too high, you may land in the blast barrel after the bees and die. If you're too low, you may not be able to make it over the bees and will need to wiggle in between them. | ||
| − | === | + | ===Alternative KremTuT Setup Tutorial=== |
| − | {{#ev:youtube|-QakXq8GsUg|560| | + | {{#ev:youtube|-QakXq8GsUg|560|}} |
| − | Notes: | + | '''Notes:''' |
| − | * | + | *Watch the video |
| − | |||
===Kremtut Reflected Bee Wiggle Visual=== | ===Kremtut Reflected Bee Wiggle Visual=== | ||
| Line 61: | Line 66: | ||
===Kremtut Lepi Setup Visual=== | ===Kremtut Lepi Setup Visual=== | ||
[[File:kremtut_lepi.jpg|700px]] | [[File:kremtut_lepi.jpg|700px]] | ||
| + | |||
| + | ===Kremtut Flowchart=== | ||
| + | [[File:Kremtut flowchart.jpg|700px]] | ||
| + | |||
| + | ===BeavTuT (Backup Jumproll)=== | ||
| + | |||
| + | {{#ev:youtube|7I5nmVNnnqo|560||}} | ||
| + | '''Notes:''' | ||
| + | *The 2 setups shown in the video allow you to not die and continue the run if you miss the trick. | ||
| + | *This setup is not free, the jump over the Gnawty with DK is actually kind of precise in terms of timing. Copy the video as best as you can. | ||
| + | *You can definitely still get a sick time with this strat, don't overlook it! | ||
| + | *Shoutouts to Snakpak. | ||
| + | |||
| + | ===Safe (No Jumproll)=== | ||
| + | {{#ev:youtube|v1yyS8YZSwA|560||}} | ||
| + | '''Notes:''' | ||
| + | *This route is the slowest, as it has no Jumprolls. To do this level faster, learn one of the Jumprolls below. | ||
| + | |||
| + | <div class="toccolours mw-collapsible mw-collapsed" style="width:700px"> | ||
| + | '''More Strats (Cool Extendo)''' | ||
| + | <div class="mw-collapsible-content"> | ||
| + | {{#ev:youtube|SFQurvp6TiU|560||}} | ||
| + | '''Notes:''' | ||
| + | *A cool extended roll to go for if you are not using any jumprolls! This what folks use in both No Major Glitches and No Major Skips | ||
| + | </div> | ||
| + | </div> | ||
Latest revision as of 17:32, 1 October 2023
 | |
| Game | Donkey Kong Country |
|---|---|
| World name | Chimp Caverns |
| Level name | Tanked Up Trouble |
| Previous level | Boss Dumb Drum |
| Next level | Manic Mincers |
Difficulty:
- BirdTuT: 6/10
- KremTuT: 10/10
- BeavTuT: 6.5/10
- No Jumproll: 1/10
Contents
All Stages
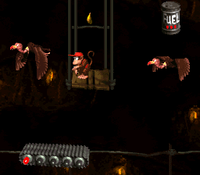
Optimal - BirdTuT Jumproll
Notes:
- Hitting a Jumproll in this stage is the most important trick in the entire run, as it saves over 40 seconds.
- This is 10 - 12.5 seconds slower than the KremTuT Jumproll described below, but is significantly less risky to go for in a run.
- The trick is to spawn the Necky at the right time, so he ends up at the correct height for you to be able to run off of the cart and get a Jumproll off of.
- To set this up, stand in the center of the cart and once the cart begins moving right after moving down, roll over to the floating platform and grab the fuel can.
- Position yourself on the left ledge of the platform. Once the right edge of the cart touches the vertical grey line supporting the cart's track, tap left to leave the platform, then begin running to the right immediately after landing.
- Make sure to tap Y for the Jumproll rather than hold, as holding can cause this one to fail if you get a double explosion.
- watch the tutorial below to understand how to best follow up the trick from this point onwards, as it can end up saving you a couple seconds and prevent you from losing your run.
Fast BirdTuT
Notes:
- Once you have settled on a setup for BirdTuT, it is recommended to use this strategy to potentially save time and also minimize the risk of hitting the bees towards the end.
Alternative BirdTuT Setup
Notes:
- An alternate setup from 2012 that you may find to be more consistent.
- To do this setup, stand in the center and run when the platform starts going right.
- Grab the fuel can.
- When you land on the platform, wait just a brief moment. If you want a cue, watch Diddy's arms and jump off once they swing all the way backwards. Alternatively, just practice to get a sense for the timing yourself.
- Land directly in the center of the bird, on its back.
- Keep Y held down until the Jumproll.
- Fall straight down.
- Run right as soon as you land on the platform. You should land near the edge of the platform, but if you almost fall off, you waited too long somewhere.
- Make sure to tap Y for the frame rather than hold, as holding can cause this one to fail.
- Follow the Fast BirdTuT tutorial above to understand how to best finish out the trick.
Optimal - KremTuT Jumproll
Notes:
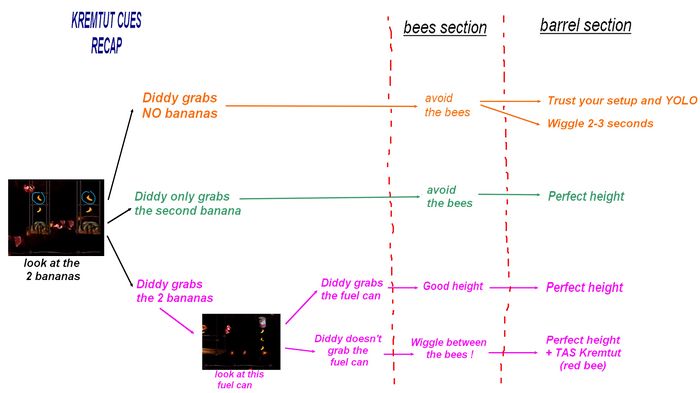
- KremTuT saves 10 - 12.5s over BirdTuT, but is riskier due to it requiring you to wiggle between platforms, and dodge some nasty bees later on (which require a certain height for the Jumproll).
- To do this setup, delay grabbing the fuel can 0:32 just a bit (like in the video) so that you don't get punished for the cart running out of fuel when you land from getting shot out of the barrel at the end of the stage.
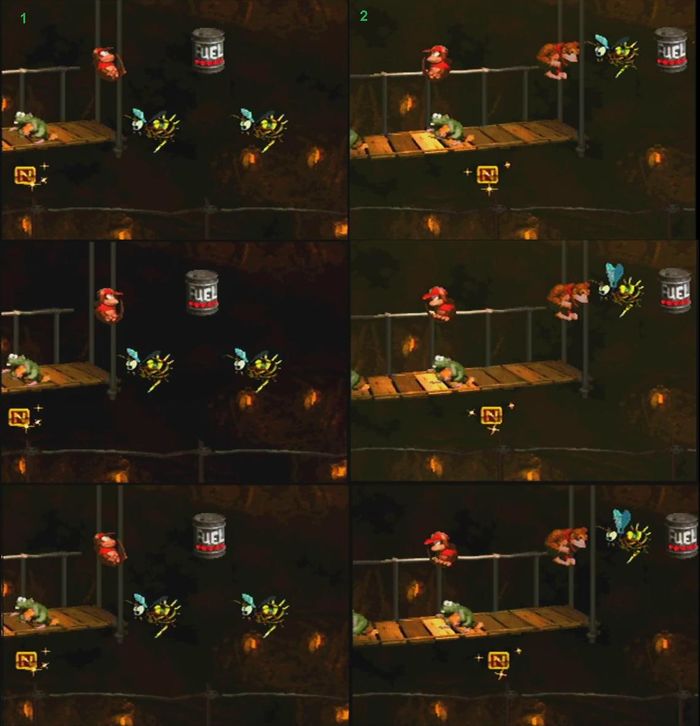
- Afterwards, position yourself directly over the rightmost lightbulb on the cart (centered over it).
- Leading up to the Jumproll itself, it's nice to jump to get DK to shut up so he doesn't distract you during the trick.
- Once the tip of the Krem's nose is centered between the 2 vertical grey supports for his floating platform, run to the left and time the Y press to get the frame.
- The moment after you hit the frame, immediately press right to avoid landing on the floating platform. You'll need to do an extra left -> right wiggle shortly afterwards to avoid both platforms as well. Then you can begin moving to the right.
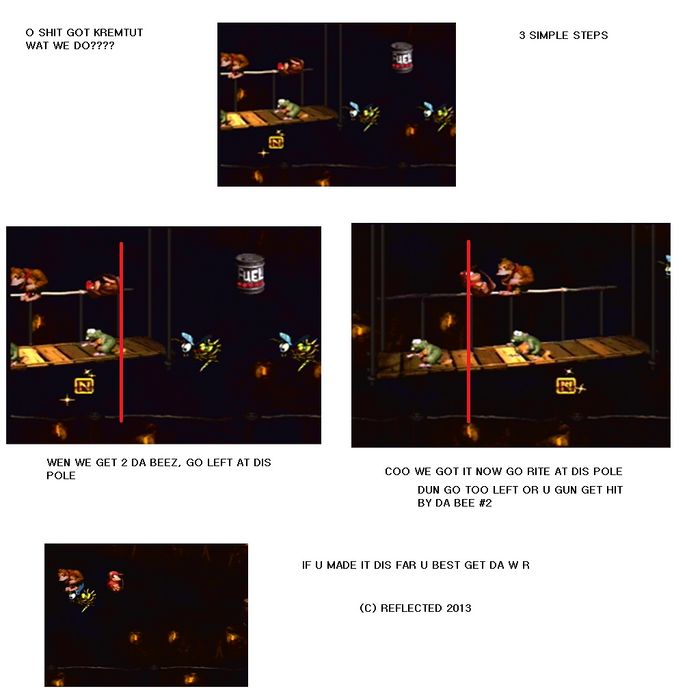
- Use the visuals in the section below as a reference for your height and for the wiggle to get past the bees at 1:00. If you're too high, you may land in the blast barrel after the bees and die. If you're too low, you may not be able to make it over the bees and will need to wiggle in between them.
Alternative KremTuT Setup Tutorial
Notes:
- Watch the video
Kremtut Reflected Bee Wiggle Visual
Kremtut Lepi Setup Visual
Kremtut Flowchart
BeavTuT (Backup Jumproll)
Notes:
- The 2 setups shown in the video allow you to not die and continue the run if you miss the trick.
- This setup is not free, the jump over the Gnawty with DK is actually kind of precise in terms of timing. Copy the video as best as you can.
- You can definitely still get a sick time with this strat, don't overlook it!
- Shoutouts to Snakpak.
Safe (No Jumproll)
Notes:
- This route is the slowest, as it has no Jumprolls. To do this level faster, learn one of the Jumprolls below.
More Strats (Cool Extendo)
Notes:
- A cool extended roll to go for if you are not using any jumprolls! This what folks use in both No Major Glitches and No Major Skips


