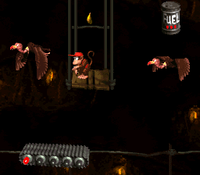
Difference between revisions of "Tanked Up Trouble"
m (Protected "Tanked Up Trouble" ([Edit=Allow only autoconfirmed users] (indefinite) [Move=Allow only autoconfirmed users] (indefinite))) |
|||
| Line 7: | Line 7: | ||
| next = [[Manic Mincers]] | | next = [[Manic Mincers]] | ||
}} | }} | ||
| − | |||
| − | ''' | + | =All Stages= |
| + | ==No Roll== | ||
| + | {{#ev:youtube|v1yyS8YZSwA|560||This route is the slowest, as it has no jumprolls. To Do this level faster, learn one of the jumprolls below.}} | ||
| + | |||
| + | |||
| + | <div class="toccolours mw-collapsible mw-collapsed" style="width:700px"> | ||
| + | '''Krem TuT (Most Optimal)''' | ||
| + | <div class="mw-collapsible-content"> | ||
| + | '''Krem TuT'''{{#ev:youtube|GD7e75Ys9NU|560||Don't choke}} | ||
Notes: | Notes: | ||
*Start on the fourth light. Jump for the light as early as possible | *Start on the fourth light. Jump for the light as early as possible | ||
| Line 18: | Line 25: | ||
*Don't forget about the last bee 'cause you survived the wiggle! | *Don't forget about the last bee 'cause you survived the wiggle! | ||
*If you die to the barrel, you started the jumproll set-up too late. | *If you die to the barrel, you started the jumproll set-up too late. | ||
| − | *Check the [[ | + | *Check the [[DKC1_Visuals]] page for alternate setups, which are easier, but can fail depending on your Y position. The wiggle is harder, but will work regardless of height. |
| + | </div> | ||
| + | </div> | ||
| + | <div class="toccolours mw-collapsible mw-collapsed" style="width:700px"> | ||
| + | '''Bird TuT (Less Optimal)''' | ||
| + | <div class="mw-collapsible-content"> | ||
'''Bird TuT''' {{#ev:youtube|MbmfYqqr-m8|560||rip 12 seconds}} | '''Bird TuT''' {{#ev:youtube|MbmfYqqr-m8|560||rip 12 seconds}} | ||
Notes: | Notes: | ||
| Line 29: | Line 41: | ||
*You must wait during this jumproll to drop low enough to avoid dying to the bees. Wait for the second Gnawty to fall off the platform. | *You must wait during this jumproll to drop low enough to avoid dying to the bees. Wait for the second Gnawty to fall off the platform. | ||
*If you don't grab the N, you should be safe. Wiggle one more time if you think you rushed the first part. If you grab it, wait in place again for a second or so. | *If you don't grab the N, you should be safe. Wiggle one more time if you think you rushed the first part. If you grab it, wait in place again for a second or so. | ||
| + | </div> | ||
| + | </div> | ||
| − | |||
| − | |||
| − | |||
| − | |||
| − | + | =101%= | |
Coming soon! | Coming soon! | ||
Revision as of 18:53, 26 November 2015
 | |
| Game | Donkey Kong Country |
|---|---|
| World name | Chimp Caverns |
| Level name | Tanked Up Trouble |
| Previous level | Boss Dumb Drum |
| Next level | Manic Mincers |
All Stages
No Roll
Krem TuT (Most Optimal)
Krem TuT
Notes:
- Start on the fourth light. Jump for the light as early as possible
- Land between fourth and fifth light
- Wiggle three times as fast as possible (wiggle = left-right/back-and-forth, so right-left-right-left-right-left-right.)
- Don't try to wiggle in-between the bees too early!
- Wiggle four times in-between the bees. If you can't stay in the center slow down a bit and pay attention to the rhythm in the video.
- Don't forget about the last bee 'cause you survived the wiggle!
- If you die to the barrel, you started the jumproll set-up too late.
- Check the DKC1_Visuals page for alternate setups, which are easier, but can fail depending on your Y position. The wiggle is harder, but will work regardless of height.
Bird TuT (Less Optimal)
Bird TuT
Notes:
- Learn both of these! That way you have two tries. This one is only 12 seconds slower.
- Start running once the platform starts moving right.
- Grab the fuel can, then wait a moment in the center (watch video closely). If you miss the fuel can, you will lose the level once you land at the end of the stage.
- Land right on the bird's back. Not too far left! Fall straight down. Don't let go of Y.
- Once you land, run right and hit the frame. If you die to the bird, you did the setup too fast.
- You must wait during this jumproll to drop low enough to avoid dying to the bees. Wait for the second Gnawty to fall off the platform.
- If you don't grab the N, you should be safe. Wiggle one more time if you think you rushed the first part. If you grab it, wait in place again for a second or so.
101%
Coming soon!