Difference between revisions of "Krockhead Klamber"
(Created page with "'''PLEASE REPLACE THESE VIDEOS AND DELETE THIS TEXT''' ==Any%== Level description like talking about how you should roll off the ledge and jump right when you pick up the DK ...") |
m |
||
| (63 intermediate revisions by 10 users not shown) | |||
| Line 1: | Line 1: | ||
| − | ' | + | {{Infobox level |
| + | | image = KrocheadKlamber.png | ||
| + | | game = Donkey Kong Country 2 | ||
| + | | world_name = [[Krem Quay]] | ||
| + | | level_name = Krockhead Klamber | ||
| + | | previous = [[Glimmer's Galleon]] | ||
| + | | next = [[Rattle Battle]] | ||
| + | }} | ||
| + | Difficulty: | ||
| + | *Safe: 3/10 | ||
| + | *Optimal: 5/10 | ||
==Any%== | ==Any%== | ||
| − | + | <b><font size="3.5"> [[Others_Warpless#Krockhead_Klamber | Warpless videos]] </font></b><br /> | |
| + | ===Safe=== | ||
| + | {{#ev:youtube|ZwDaPKJlGxY|560||https://www.youtube.com/watch?v=ZwDaPKJlGxY}} | ||
| + | '''Notes''' | ||
| + | *Try to spend as little time possible holding the reeds. | ||
| + | * '''New to the Wrong Warp? Check out the tutorial below!''' | ||
| − | {{#ev:youtube| | + | <div class="toccolours mw-collapsible mw-collapsed" style="width:600px"> |
| + | '''WRONG WARP TUTORIAL''' | ||
| + | <div class="mw-collapsible-content"> | ||
| + | '''Basic Safe Setup''' | ||
| + | {{#ev:youtube|3LfRaBh62qY|560||https://www.youtube.com/watch?v=3LfRaBh62qY}} | ||
| + | *It's a 25 frame window. Careful not to kill the guy (means you were too close to him). | ||
| + | *If you throw from too far left and Dixie doesn't take damage, you can try again by going left to despawn the guy and then coming back. | ||
| − | = | + | '''Alternative Safe Setup''' |
| + | {{#ev:youtube|iYGVQ6kMBGk|560||https://www.youtube.com/watch?v=iYGVQ6kMBGk}} | ||
| + | *This is not as fast as the trihard setup, but you may find this setup more consistent. | ||
| + | *Stand at the sign, then when the Kutlass is about to swing the sword, do a full roll (hold Y) to the left while holding down to normalize the distance. | ||
| + | *The normalization removes the need of a visual cue for the throw, but make sure to start the roll earlier than with the other safe setup. | ||
| + | </div> | ||
| + | </div> | ||
| − | + | ===Optimal=== | |
| + | {{#ev:youtube|oBkjwBLHrEo|560||https://www.youtube.com/watch?v=oBkjwBLHrEo}} | ||
| + | '''Additions''' | ||
| + | *At the beginning, jump over the Kutlass instead of killing him. | ||
| + | *At 0:09, roll over the gap between the platforms. This can be tricky to execute, as if you buffer your roll, you won't make it. (Saves ~.25s). | ||
| + | *At 0:12, perform the Riz Roll. You need to learn when you can safely jump under the Kaboing, and when you have to jump from the water to avoid the reed and the Flitter (Saves ~.3s). | ||
| + | *At 0:23, it is more optimal to bait the Kutlass as early as possible. For this setup, you want to line up Dixie's face with the end of the sign, and then throw at the black dot on the floor. | ||
| + | *You can be a little more optimal with this setup, but it would be easier to perform the "Luke Wiggle" strat listed under the "MORE STRATS" section. | ||
| − | {{#ev:youtube| | + | <div class="toccolours mw-collapsible mw-collapsed" style="width:600px"> |
| + | '''MORE STRATS''' | ||
| + | <div class="mw-collapsible-content"> | ||
| + | {{#ev:youtube|zhfj6ibbF1g|560||https://www.youtube.com/watch?v=zhfj6ibbF1g&t=42}} | ||
| + | An alternate wrong warp setup: {{#ev:youtube|5GCDkguI4Qk|560||https://youtu.be/5GCDkguI4Qk}} | ||
| + | {{#ev:youtube|vf98oEihAQw|560||https://www.youtube.com/watch?v=vf98oEihAQw}} | ||
| + | *For Luke Wiggle, you want to line up Diddy's nose so it's completely covering the plant, or just before this point (Saves ~.1s). | ||
| + | *You can be a little further to the right, but at that point it would be more worth it to go for the other strat. | ||
| + | *To go even further and beyond, cover the black dot on the floor with Diddy's feet, jump at the sign, and then throw at the bananas. [https://www.youtube.com/watch?v=8TGalu36BHA Don't forget to channel your Ki.] (Saves ~.2s over Luke Wiggle). | ||
| + | *The setup from the second video isn't recommended since it's not much easier than going even further and beyond, and it's much harder than Luke Wiggle (while only saving ~.1s over it). | ||
| + | </div> | ||
| + | </div> | ||
| + | <div class="toccolours mw-collapsible mw-collapsed" style="width:600px"> | ||
| + | '''SSJ3 WARP SETUP TUT''' | ||
| + | <div class="mw-collapsible-content"> | ||
| + | [[File:postup.png]] | ||
| + | *Start off by posting up post post on this dot. | ||
| + | [[File:postuppt2.png]] | ||
| + | *Start moving left after the Kutlass starts charging at you but before the swords are at their apex. | ||
| + | [[File:postuppt3.png]] | ||
| + | *Do the shortest short-hop you can starting in the gap between the signpost and the ground post. | ||
| + | [[File:postuppt4.png]] | ||
| + | *Throw your girlfriend towards the Kutlass at the banana arrow after you lose a lil bit of height. | ||
| + | [[File:postuppt5.png]] | ||
| + | *Continue holding Y after your throw and press left as you touch the ground to moonwalk to the cannon. | ||
| + | [[File:postuppt6.png]] | ||
| + | *Hold right and Y as you blast out the barrel. | ||
| + | {{#ev:youtube|bcOWHKFcW_A|560||https://www.youtube.com/watch?v=bcOWHKFcW_A}} | ||
| + | *Put it all together and it should look like this. | ||
| + | *This only saves like 0.2 so only do it if you're really really confident. | ||
| + | </div> | ||
| + | </div> | ||
| − | [[Category: | + | [[Category:Krem Quay]] |
[[Category:Level]] | [[Category:Level]] | ||
Latest revision as of 17:26, 20 August 2022
 | |
| Game | Donkey Kong Country 2 |
|---|---|
| World name | Krem Quay |
| Level name | Krockhead Klamber |
| Previous level | Glimmer's Galleon |
| Next level | Rattle Battle |
Difficulty:
- Safe: 3/10
- Optimal: 5/10
Any%
Safe
Notes
- Try to spend as little time possible holding the reeds.
- New to the Wrong Warp? Check out the tutorial below!
WRONG WARP TUTORIAL
Basic Safe Setup
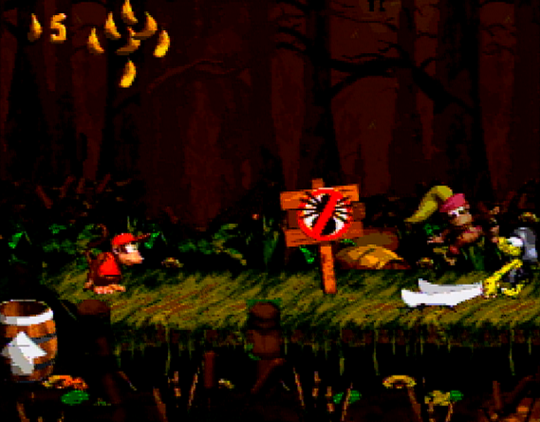
- It's a 25 frame window. Careful not to kill the guy (means you were too close to him).
- If you throw from too far left and Dixie doesn't take damage, you can try again by going left to despawn the guy and then coming back.
Alternative Safe Setup
- This is not as fast as the trihard setup, but you may find this setup more consistent.
- Stand at the sign, then when the Kutlass is about to swing the sword, do a full roll (hold Y) to the left while holding down to normalize the distance.
- The normalization removes the need of a visual cue for the throw, but make sure to start the roll earlier than with the other safe setup.
Optimal
Additions
- At the beginning, jump over the Kutlass instead of killing him.
- At 0:09, roll over the gap between the platforms. This can be tricky to execute, as if you buffer your roll, you won't make it. (Saves ~.25s).
- At 0:12, perform the Riz Roll. You need to learn when you can safely jump under the Kaboing, and when you have to jump from the water to avoid the reed and the Flitter (Saves ~.3s).
- At 0:23, it is more optimal to bait the Kutlass as early as possible. For this setup, you want to line up Dixie's face with the end of the sign, and then throw at the black dot on the floor.
- You can be a little more optimal with this setup, but it would be easier to perform the "Luke Wiggle" strat listed under the "MORE STRATS" section.
MORE STRATS
An alternate wrong warp setup:
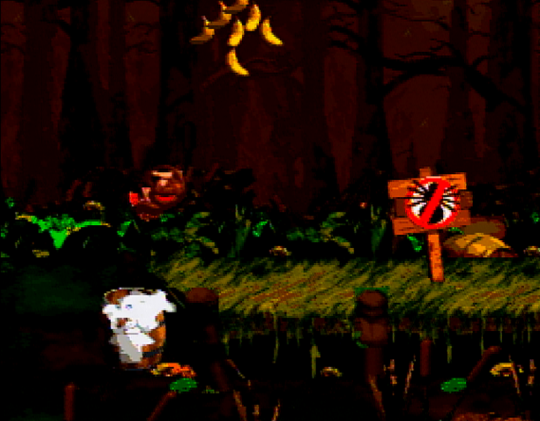
- For Luke Wiggle, you want to line up Diddy's nose so it's completely covering the plant, or just before this point (Saves ~.1s).
- You can be a little further to the right, but at that point it would be more worth it to go for the other strat.
- To go even further and beyond, cover the black dot on the floor with Diddy's feet, jump at the sign, and then throw at the bananas. Don't forget to channel your Ki. (Saves ~.2s over Luke Wiggle).
- The setup from the second video isn't recommended since it's not much easier than going even further and beyond, and it's much harder than Luke Wiggle (while only saving ~.1s over it).
SSJ3 WARP SETUP TUT
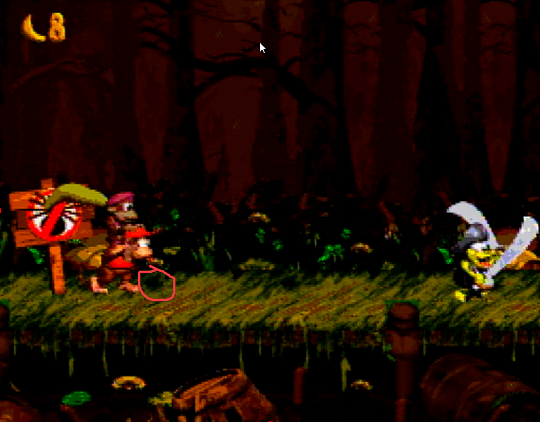
- Start off by posting up post post on this dot.
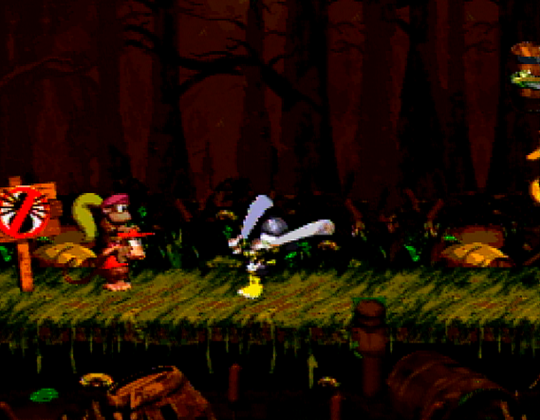
- Start moving left after the Kutlass starts charging at you but before the swords are at their apex.
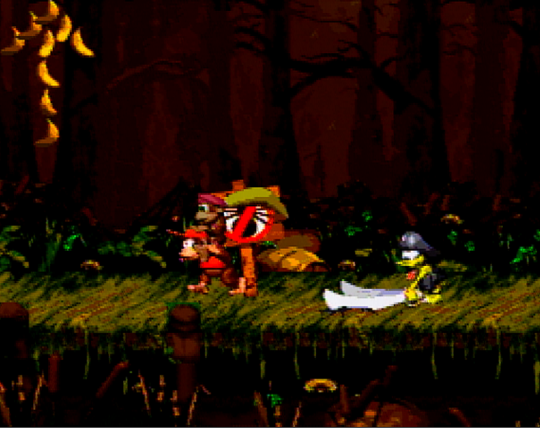
- Do the shortest short-hop you can starting in the gap between the signpost and the ground post.
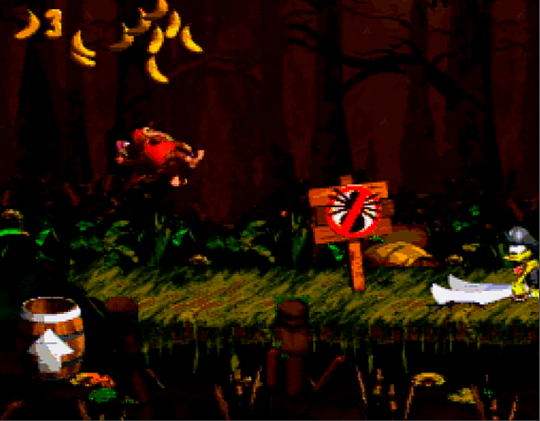
- Throw your girlfriend towards the Kutlass at the banana arrow after you lose a lil bit of height.
- Continue holding Y after your throw and press left as you touch the ground to moonwalk to the cannon.
- Hold right and Y as you blast out the barrel.
- Put it all together and it should look like this.
- This only saves like 0.2 so only do it if you're really really confident.
